


Software development keeps changing consistently and we often need to update our software quickly. To make sure these updates work well and don’t cause problems in the future, we need to use good testing methods and strategies.
One of these strategies is to create test plans in Azure DevOps, a powerful tool designed to simplify the development process and ensure the delivery of robust and error-free applications.

In this article, we’ll teach you how to use Azure DevOps, how to create test plans in Azure DevOps, and how they work. Whether you are a seasoned software developer or a newcomer to Azure DevOps, you’ll find practical tips in this guide to optimize your testing procedures and boost the quality of your software releases.
Azure DevOps is a comprehensive platform that supports the entire software development lifecycle and equips the development team with tools to plan, develop, test, and deliver software efficiently. Among its many features, Azure DevOps test plans emerge as a critical aspect for managing and executing testing activities.
What is Azure Test Plan?
Azure Test Plan is a test management and execution toolset offered by Microsoft as part of its Azure DevOps services. It assists software developers and testers in managing testing efforts in the software development lifecycle.
Azure Test Plan is an effective tool for development teams that follows Agile and DevOps development methodologies, as it helps to ensure the quality of software through effective test management and execution. It offers flexibility in terms of manual and automated testing, making it suitable for a wide range of testing scenarios.
Below are the key capabilities of the Azure Test Plan.
1. Test planning
With the Azure Test Plan, you can create test plans, define test suites, and organize test cases. Working collaboratively, testers and test managers can create test cases based on specific requirements.
2. Test execution
Azure Test plan allows testers to execute test cases and store their results. On top of that, the tester can mark the test case as fail, pass, blocked, or not executed.
3. Test data and parameters
It supports data-driven testing where the users can run the same test case with multiple sets of input data to verify how an application behaves under various conditions.
4. Exploratory testing
It allows users to perform exploratory testing sessions where testers, instead of following scripted test cases, explore the application dynamically.
5. Test automation
It integrates with automation tools and frameworks and allows users to automate the execution of test cases and include automation tests in their test plans.
6. Bug tracking
You can track bugs and issues directly from the Azure DevOps series, making it easier to track and follow up on bugs in your application ahead of the deployment.
7. Security and permissions
You can manage access and permissions for different team members to control who can create, execute, and manage tests.
How do they work?
Azure DevOps test plans provide an efficient way to manage testing activities within the Azure DevOps environment. Here is how they work:
1. Test planning
Test Plans in Azure DevOps allow you to plan your testing efforts. You can create test suites and organize test cases within these suites. These test cases can be designed to cover different aspects of your application, such as functionality, integration, or regression testing.
2. Test case creation
You can create test cases within the Azure DevOps test plans. Each test case includes details about what needs to be tested, steps to follow, and expected results. These test cases act as a roadmap for your testing activities.
Test case creation in Azure Test Plans offers a variety of options to cater to different needs. Users can initiate the process by adding a new test case using the work item form. Also, existing test cases can be added to the suite by selecting from a dialog, providing flexibility in the test suite population.
The grid view mode presents a user-friendly interface for creating multiple test cases at once, automatically incorporating them into the suite. Test case order within a suite can be easily adjusted through a drag-and-drop mechanism, exclusively applicable to manual test cases. Furthermore, users can move test cases from one suite to another using a drag-and-drop UI.
Users can export existing test cases to a CSV file for convenient modifications using Excel. Also, it supports importing changes made to test cases from a CSV file.
The grid view mode facilitates viewing and editing multiple test cases along with their corresponding test steps.
Additional features include the ability to toggle full-screen mode for an expanded view and apply filters to test cases. Users can customize their view by adding or removing fields using column options, selecting from a list primarily derived from the test case work item form. Moreover, the option to copy or clone test cases helps duplicate test cases with the ability to specify destination details and include existing links or attachments. For efficient test case bulk updates, the grid view mode enables users to edit, insert, delete, or clear rows, with changes easily saved or discarded.
3. Test execution
When it’s time to start testing, you can assign test cases to testers and the testing environment. Testers can then execute the test cases, follow the defined steps, and provide feedback on the results.
4. Traceability
Azure DevOps Test Plans offer traceability features. This means you can link test cases to user stories, features, or requirements, ensuring testing meets your project goals. On top of that, this traceability helps in tracking progress and ensures comprehensive coverage.
5. Test results and reporting
As testers execute test cases, they can mark them as pass, fail, or blocked, and provide comments. Azure DevOps captures these results and provides real-time reporting on the testing progress. This reporting is useful for testers and team managers as it enables them to monitor the quality of the application.
6. Bugs and defect management
If a tester identifies a bug or issue during the testing, they can create a bug directly from the test case. This integrates defect management into your testing process, ensuring that issues are properly tackled and addressed.
7. Integration with Azure pipeline
Azure DevOps test plans can be easily integrated with Azure CI/CD pipelines. This integration allows you to automate the execution of test cases as part of your build and release pipeline, making testing an integral part of your development process.
8. Collaboration
Azure DevOps promotes collaboration among team members. Testers, developers, and project managers can work together within the same environment, making communication and issue resolution more efficient.
9. Historical data
Azure DevOps retains historical data, allowing you to analyze trends, track improvements, and make data-driven decisions for future releases.
How to create a test plan in Azure DevOps?
You can create a test plan in Azure DevOps to monitor manual testing during sprints. This way, you can easily determine when the testing for a particular sprint or milestone has been finished. Below are the practical steps to create test plans.
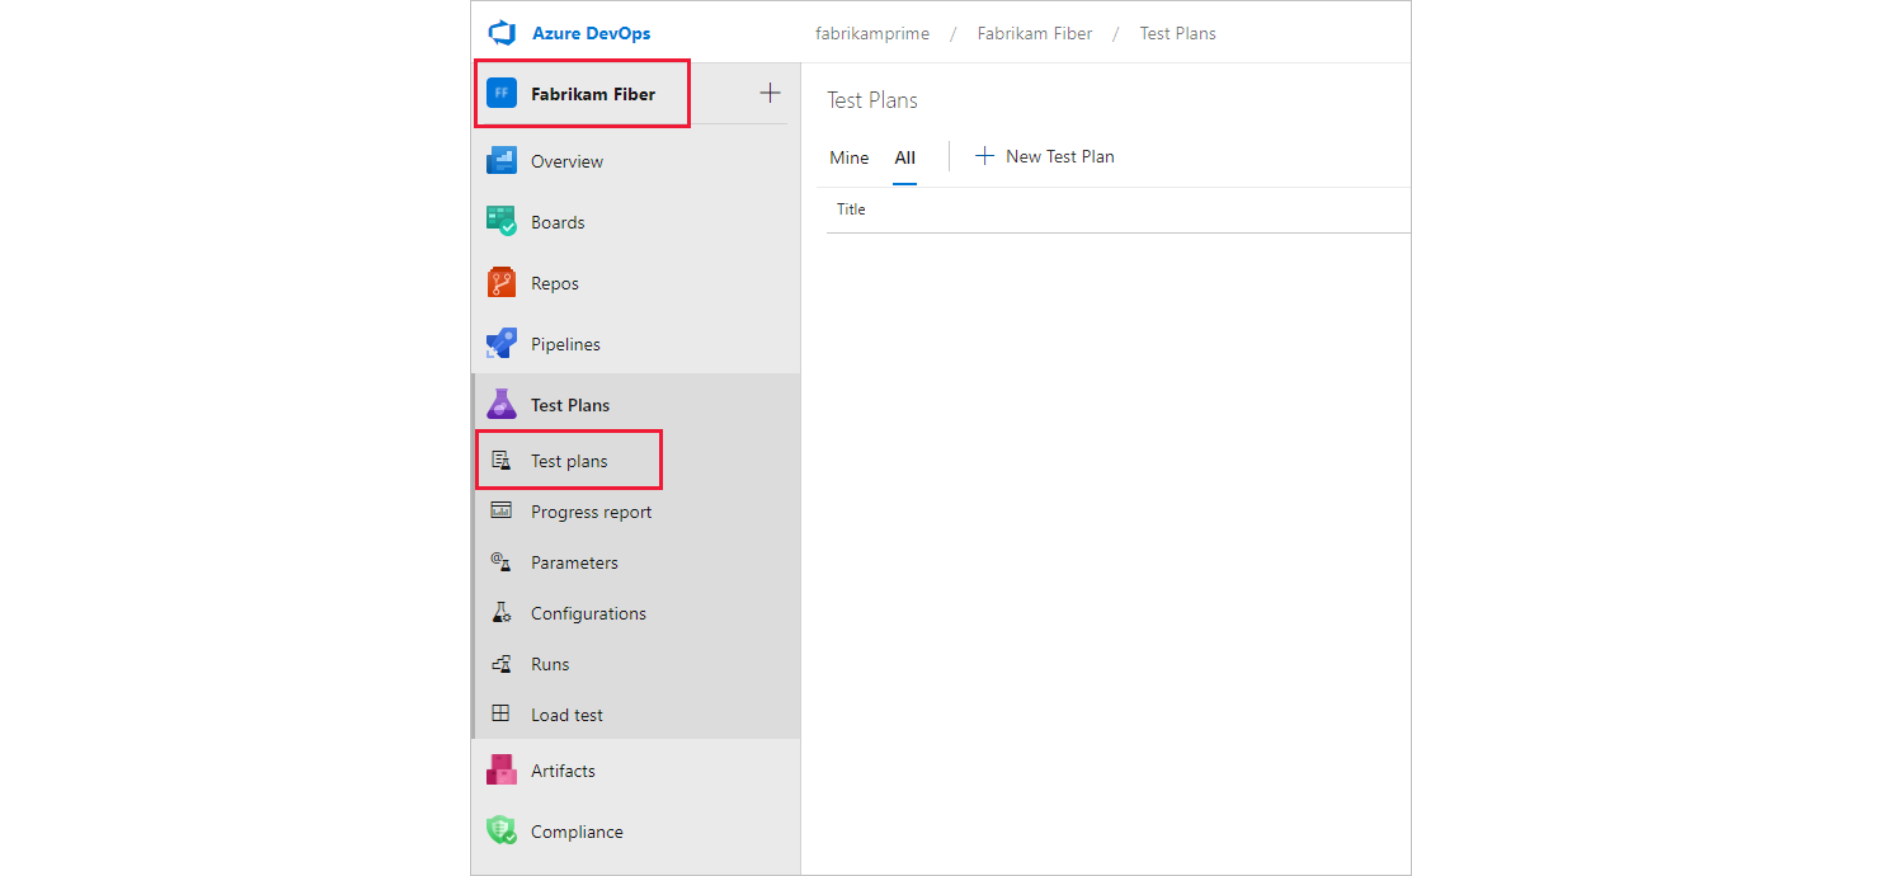
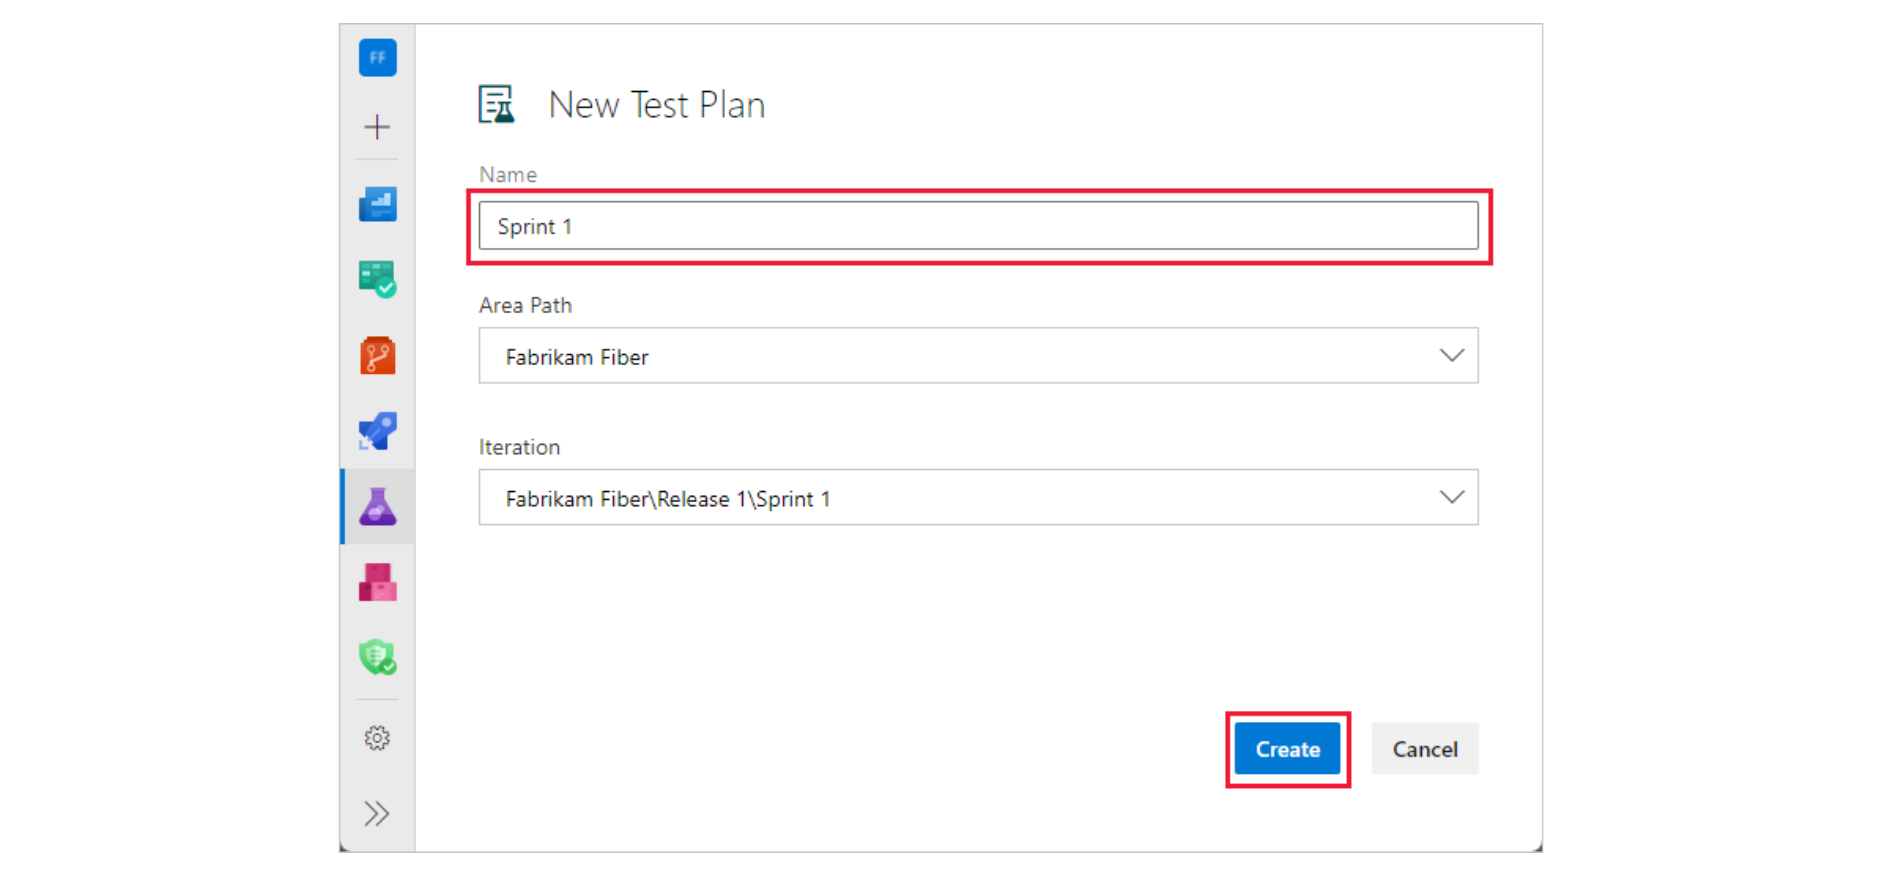
1. Go to the web portal, open your project, and click on “Test Plans.” If you’ve got a test plan, just choose “Test Plans” to see the list of all test plans.
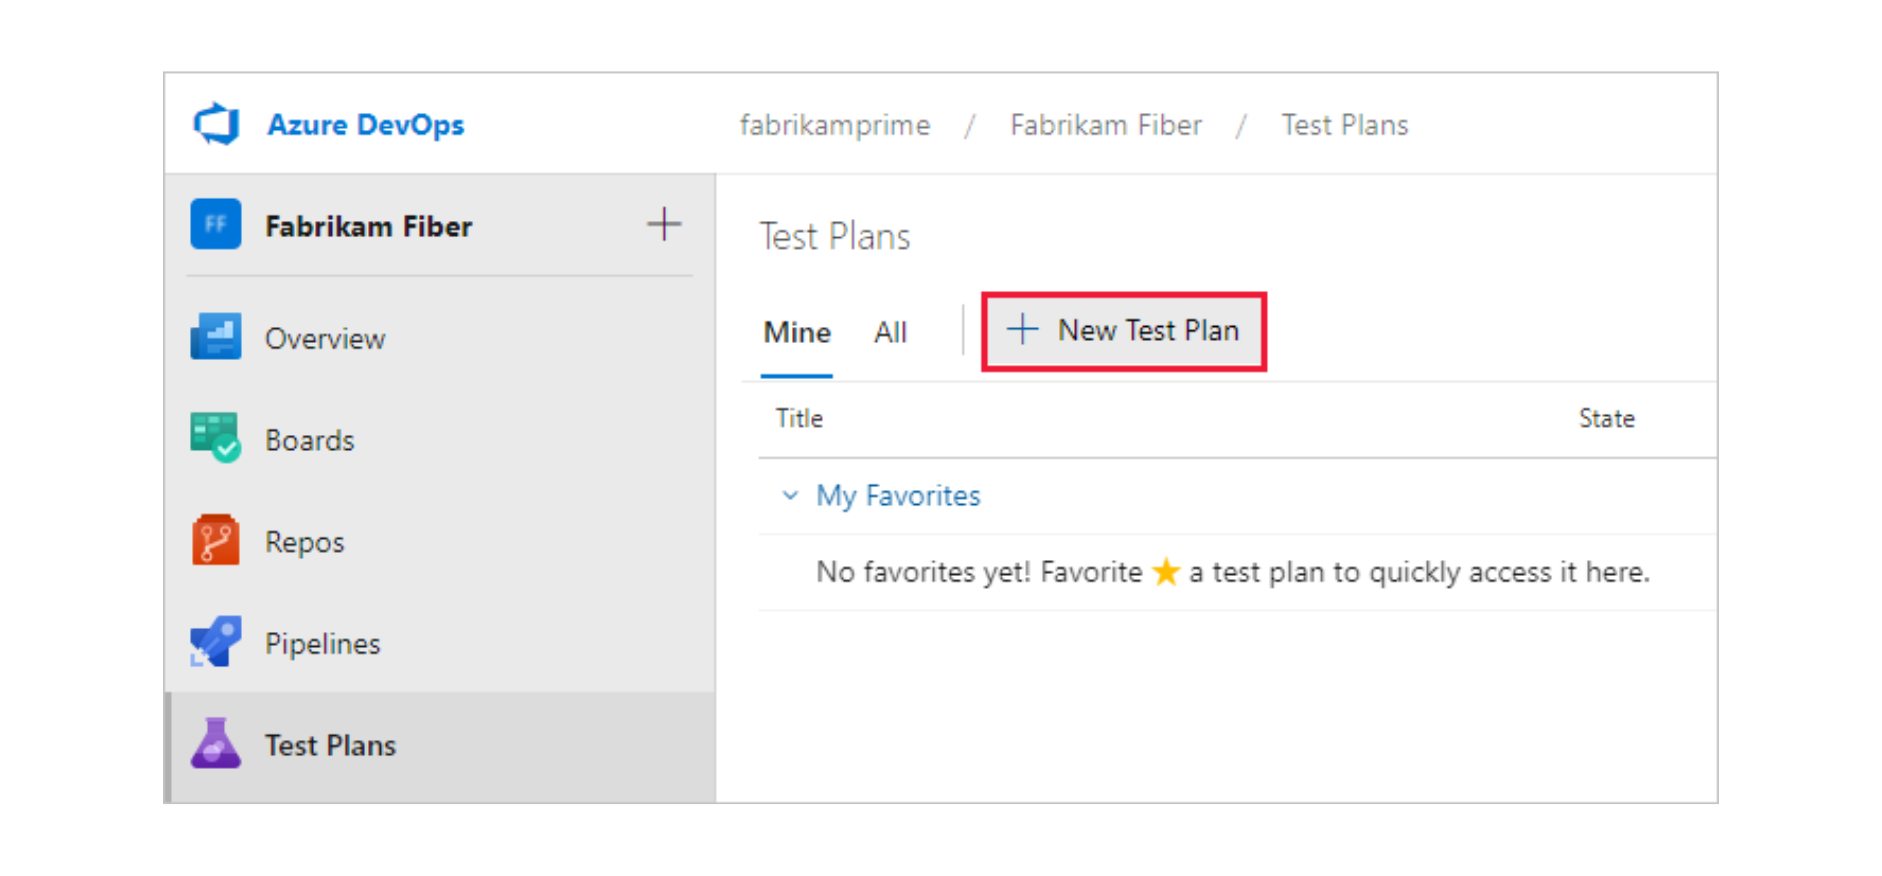
2. After you get to the “Test Plans” page, click on “New Test Plan” to make a new test plan for your ongoing sprint.
3. In the “New Test Plan,” type in a name for the test plan. Make sure the area path and iteration are set up right, and then hit the “Create” button.
How to use Azure DevOps test plans?
Learn how to use Azure DevOps Test Plans to assist test objectives. You can use the below-mentioned sections of the Microsoft Azure DevOps “Test Plans” page to complete the associated tasks.
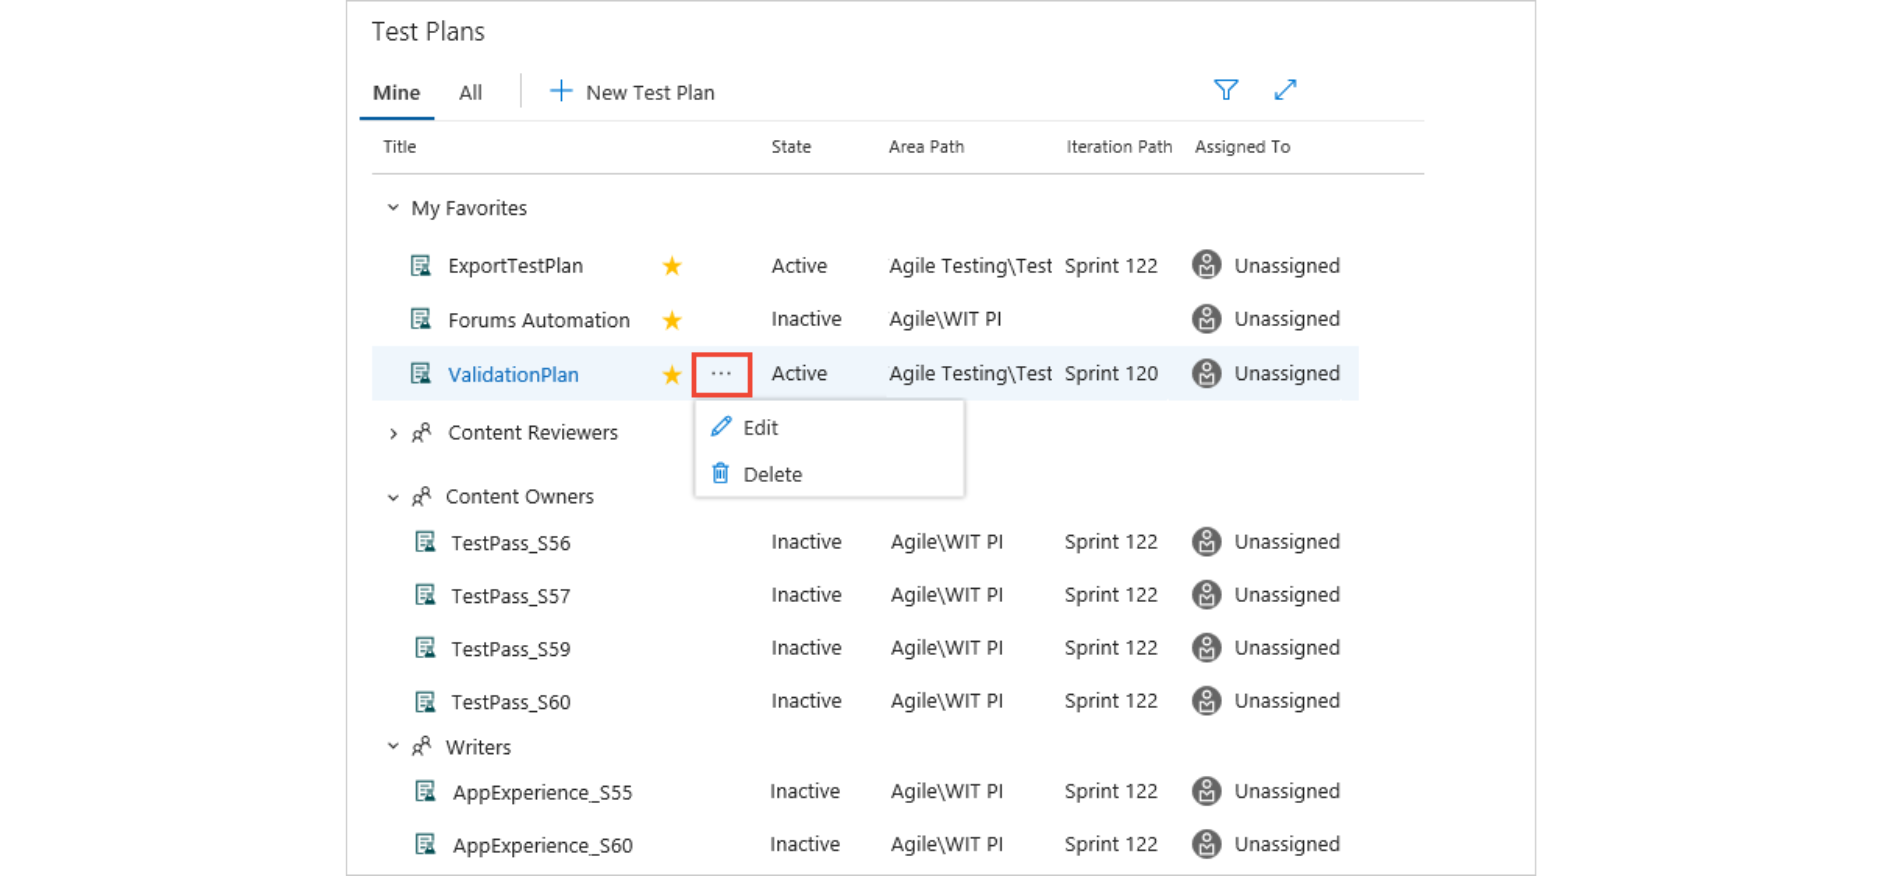
The Mine Page
The Mine Page shows a list of test plans that are important to you, including both team-related plans and your favorite selections. You have the option to expand or hide plans for each team, simplifying the process of finding and reviewing particular team plans. Besides, you can use the shortcut menu for tasks like editing or removing the chosen plan.
The Filter option allows you to sort and locate test plans, specifically when dealing with a long list of plans. You can apply filters based on the plan’s name, associated team, current status, or the specific development iteration it belongs to. These filters help you narrow down your search and find the plans you’re interested in more effectively.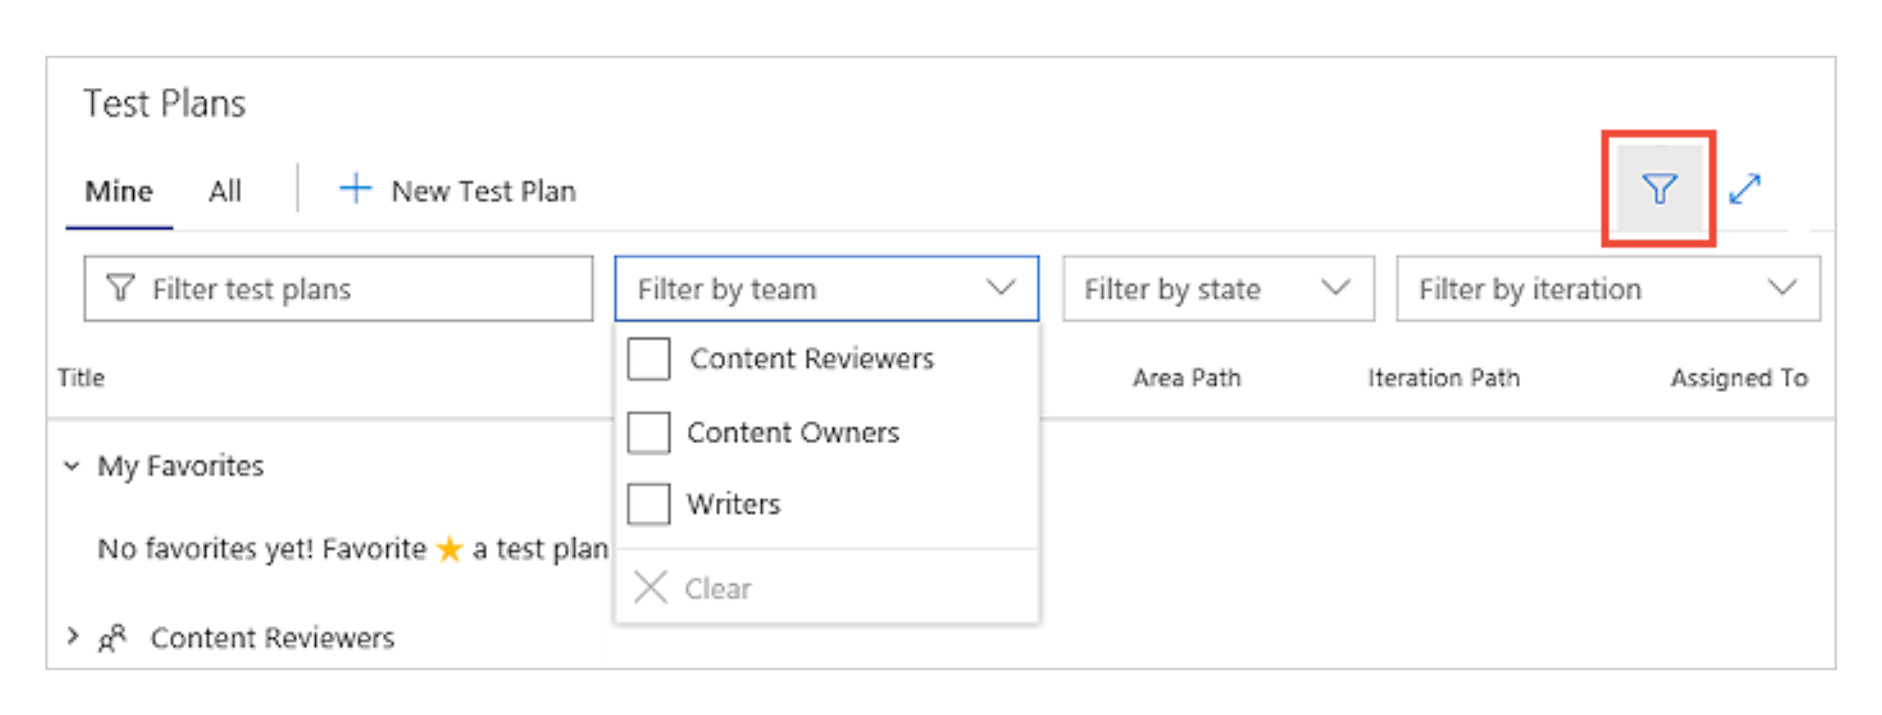
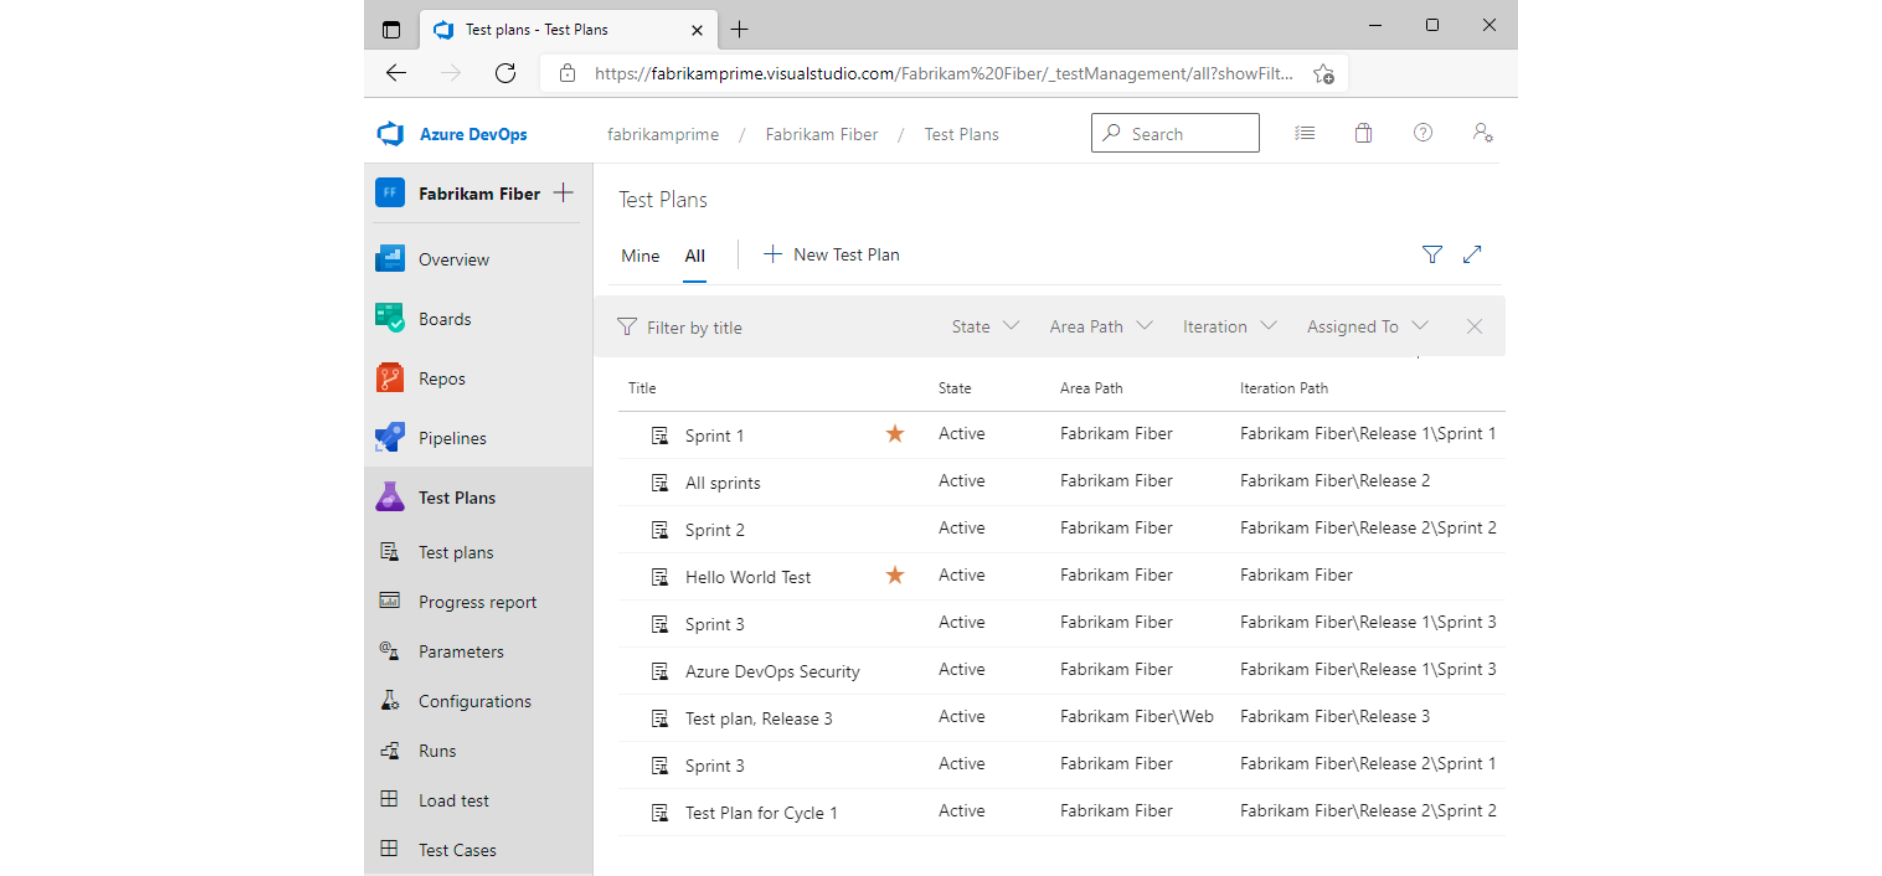
The “All” page
The All page displays a list of all available test plans. You can apply filters, and edit, and delete plans through the shortcut menu, just as you would on the Mine page. This page also allows you to include any test plan in your list of favorites. 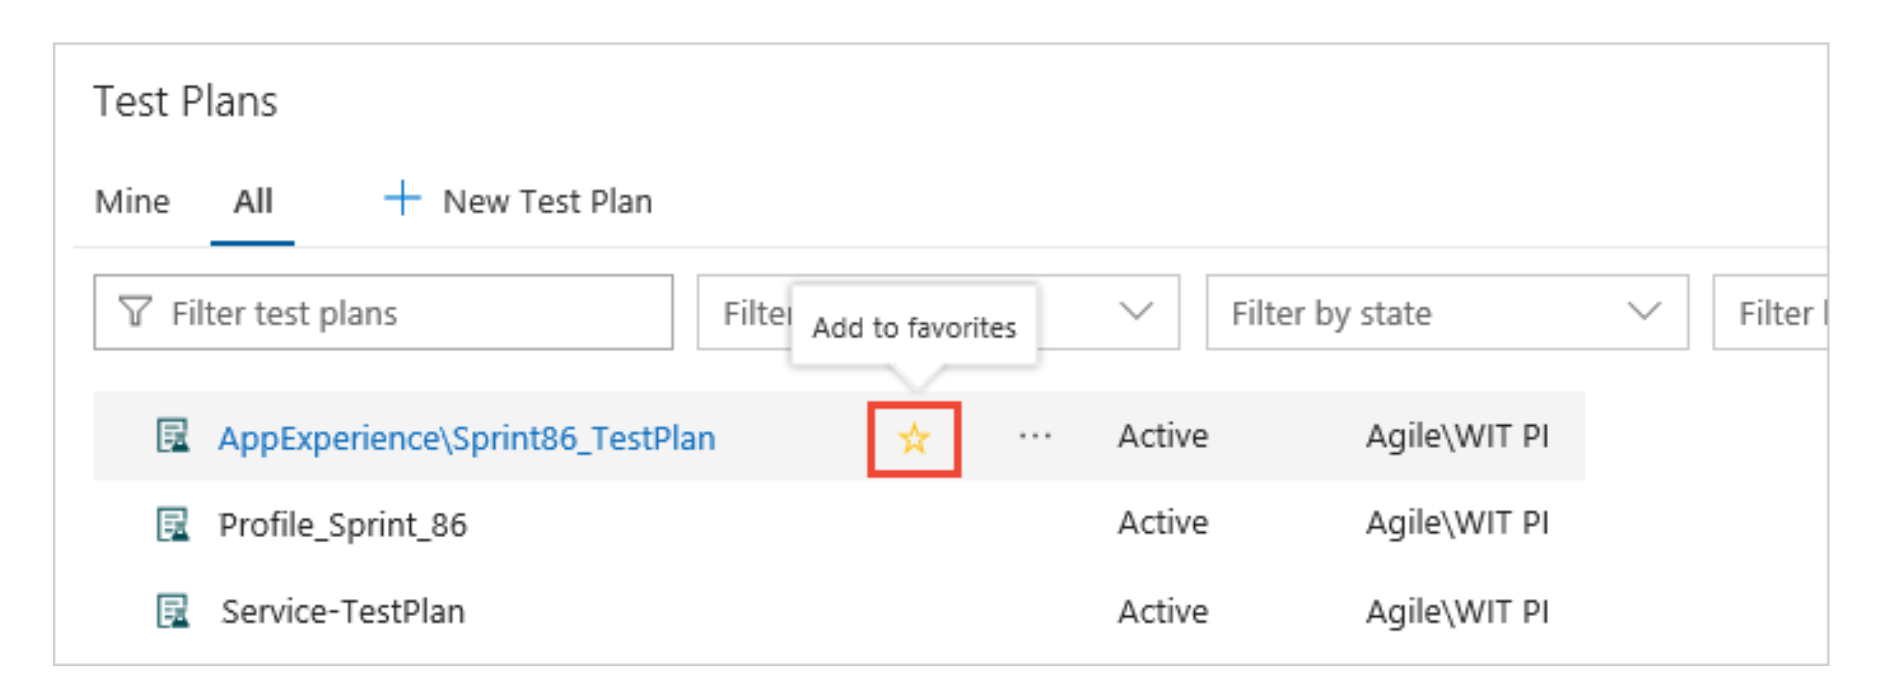 While viewing a plan, you have the option to include it in your list of favorites.
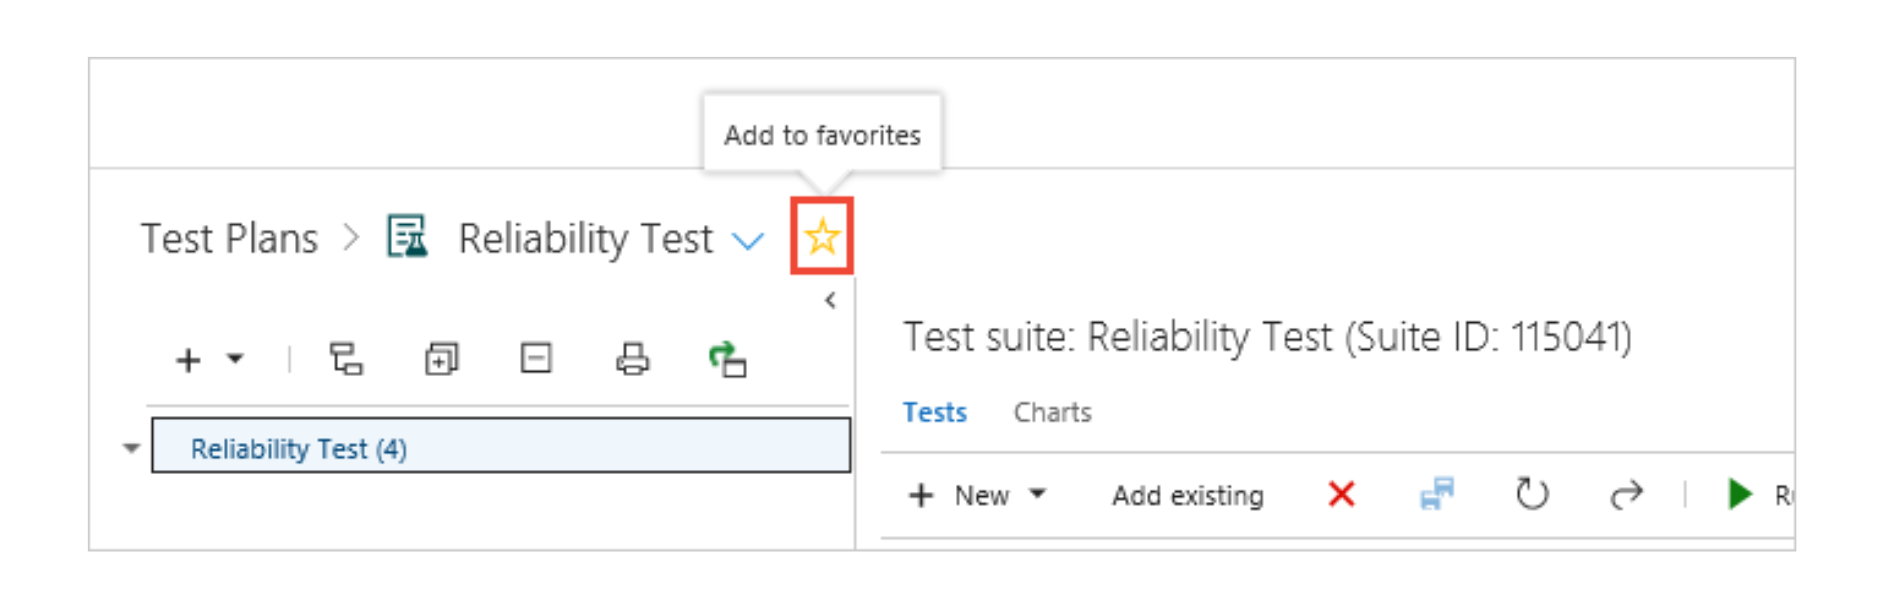
Test plan header
The test plan header allows you to perform one of these tasks:
- You can choose to mark or unmark a test plan as a favorite.
- Access the test plan you like the most.
- Check the test plan iteration path to see if it’s marked as current or past.
- Click on the view report link to go to the test progress report.
- Return to the All/Mine test plans page by clicking on the “All test plans” option.
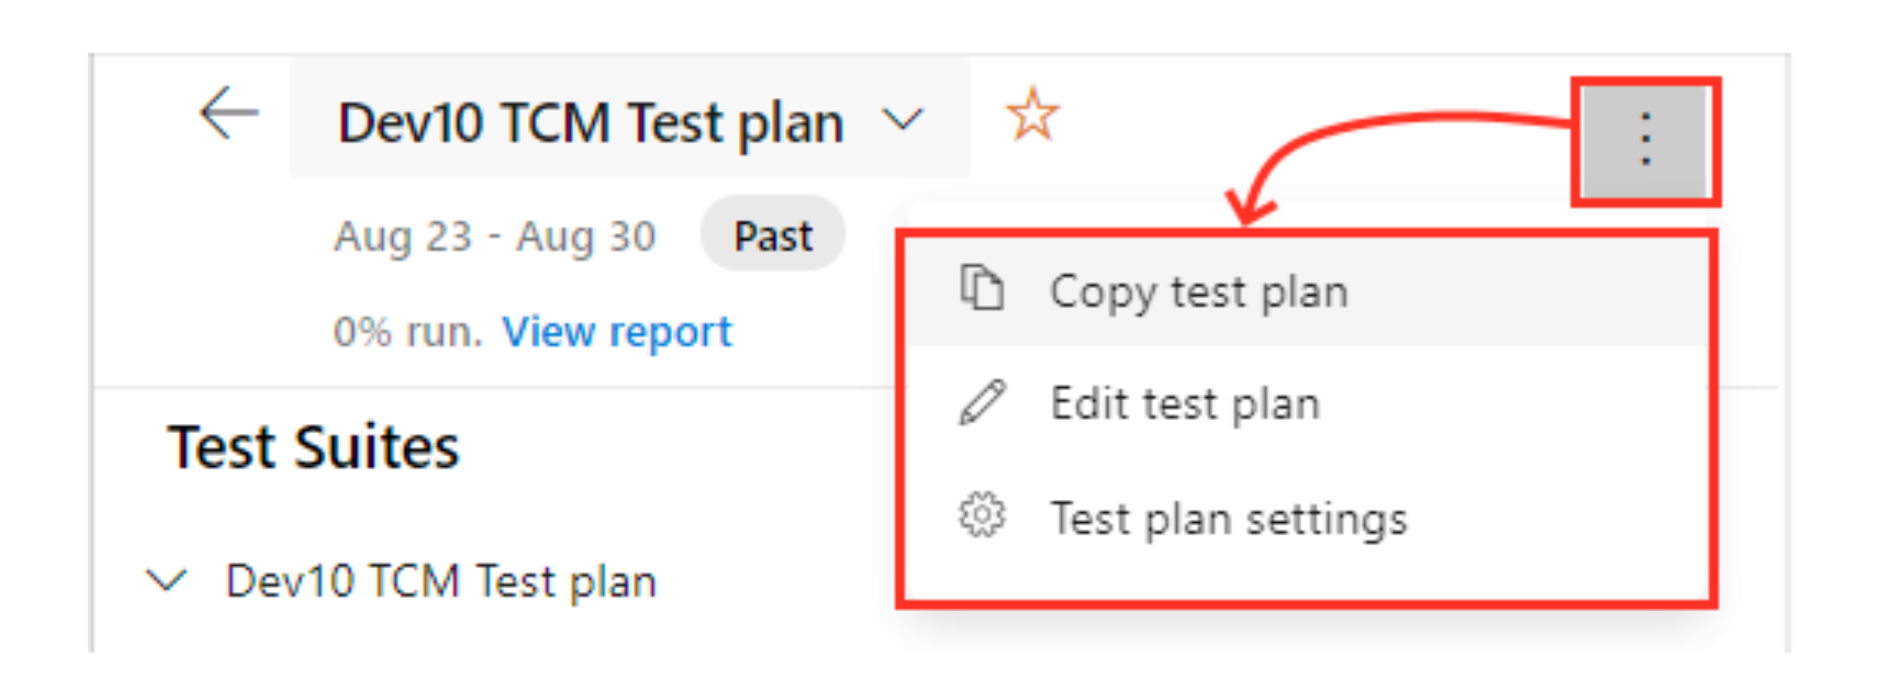
Test plan Context Menu
Select the “more” option to access a test plan’s context menu, which allows you to perform one of these actions:
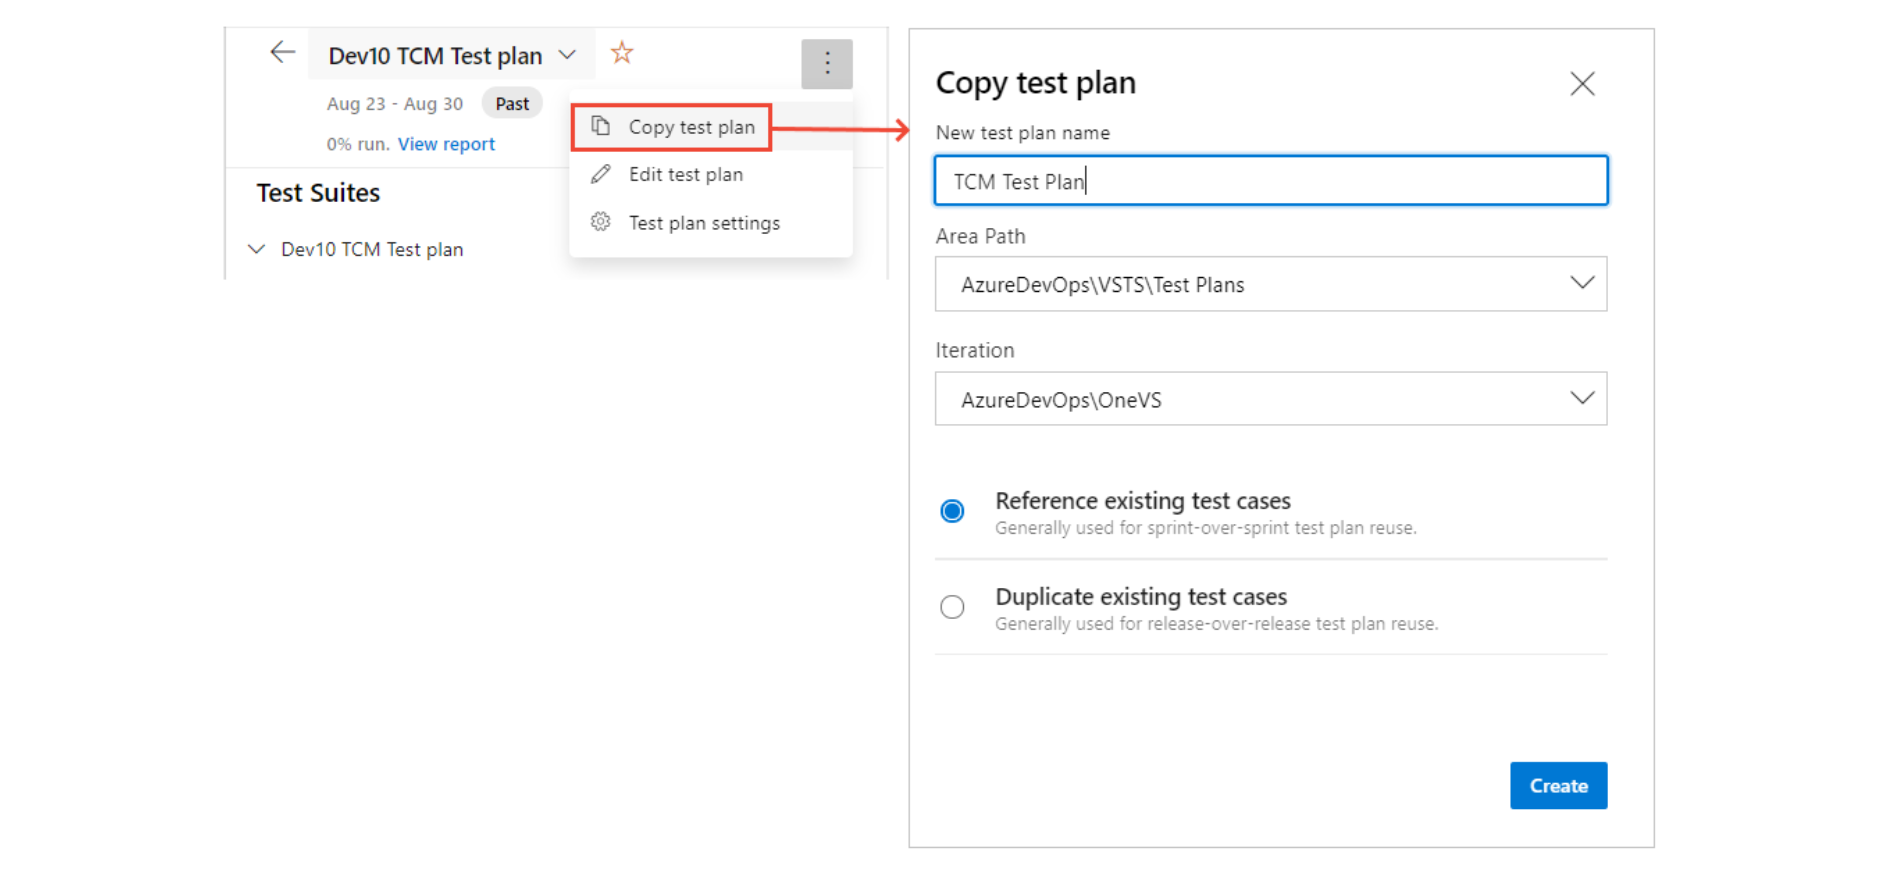
- Copy test plan: Immediately create a copy of an existing test plan.
- Edit test plan: Customize the test plan form by adding details to the description or discussion.
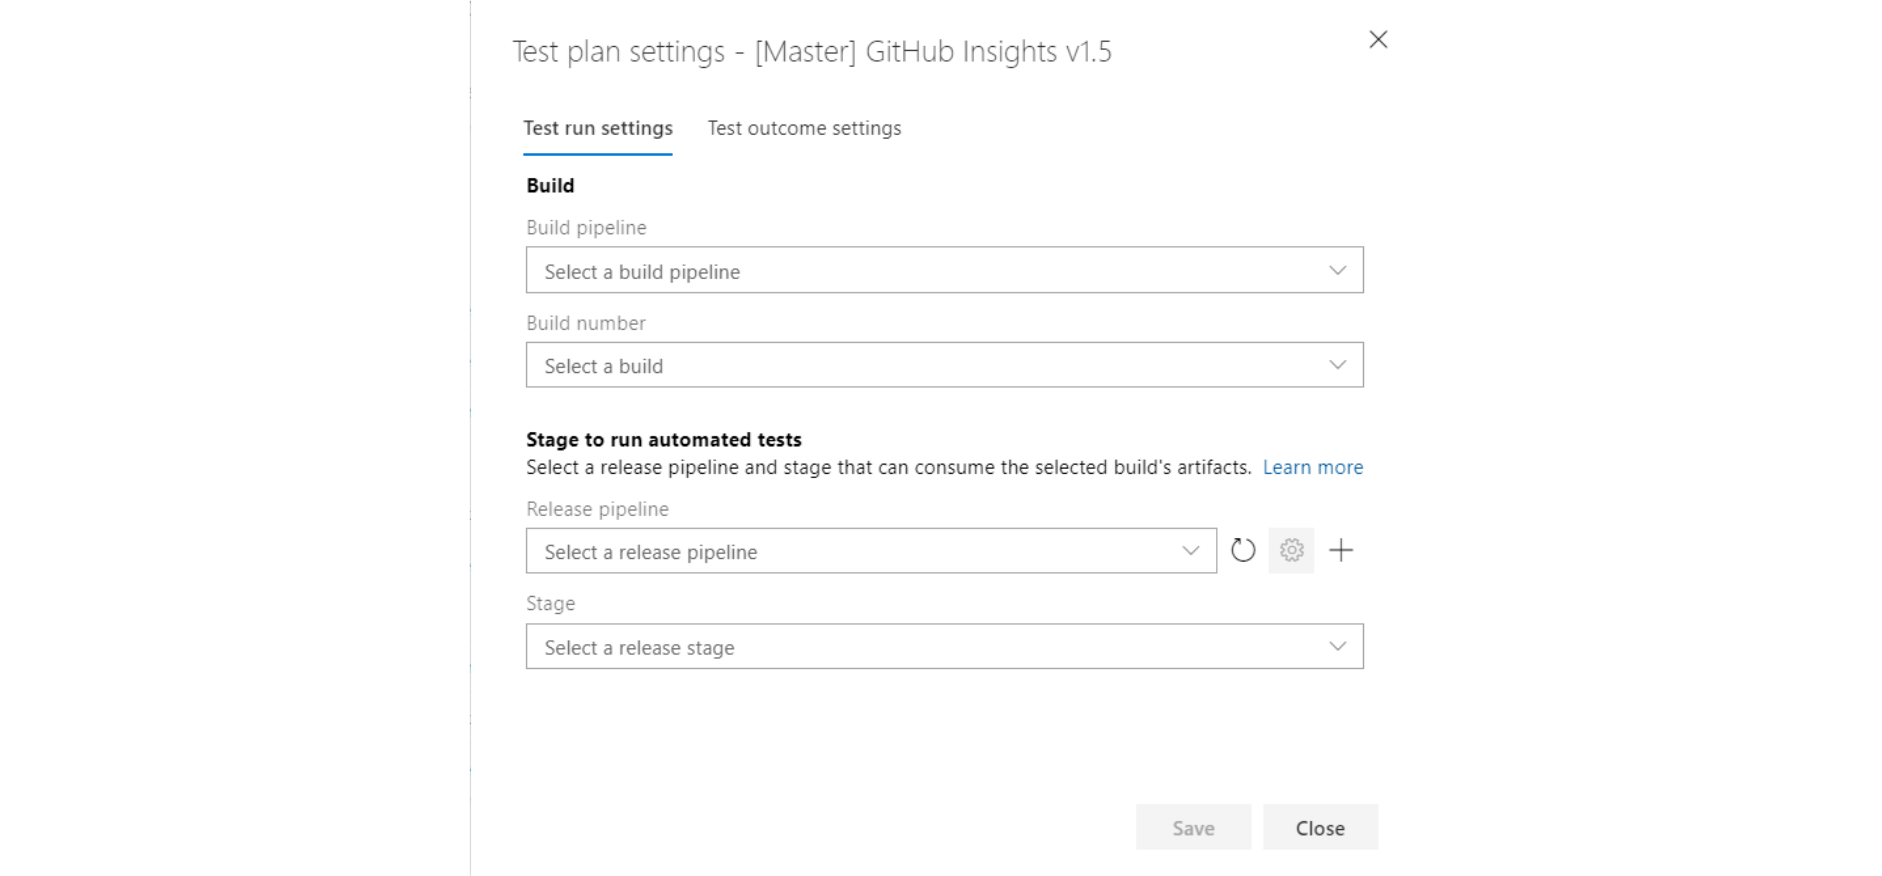
- Test plan settings: You can configure the test run settings which helps to connect them with the build or release properties, and set up the test outcome settings.
Adjust settings for the test plan
Select the test plan parameters for setting up test executions or recording test results.
Copy test plan
It’s good practice to make a fresh test plan for each sprint or release. You can duplicate the test plan from the previous cycle, and with just a few adjustments, the duplicated plan is set for the newsprint. You can perform this task with the Copy test plan menu option. Eventually, you can create a copy of an existing test plan within the same project.
Test suite header tasks
The Test suite header provides users the capability to perform the following tasks.
- Expand/Collapse: This toolbar provides options to expand all or collapse all, which can be used to reveal or hide the suite hierarchy tree.
- Show test nodes from child suites: Select the Show test points from the child suites option in the toolbar, which is available on the execute tab. This option enables you to see all the test points associated with the current suite and its sub-suites in a single view.
- Order suites: You can rearrange the sequence of suites or transfer them between different suite hierarchies in the test plan by simply dragging and dropping them.
Test suites Context Menu option
Choose the “More options” menu to access a test suite’s context menu. Then proceed with one of the actions below:
- Create new test suites: You have the option to create new suites and choose from three different types:
– Choose Static Suite when you want to structure your tests in a suite that resembles a folder.
– Select the Requirement-based suite for a direct combination of requirements.
– Choose a Query-based suite to manage test cases based on specific query criteria. - Assign configurations: Specify browser configurations for the suite, like Chrome and Firefox. These configurations will be used for all test cases in the suite, whether they already exist or added in the future.
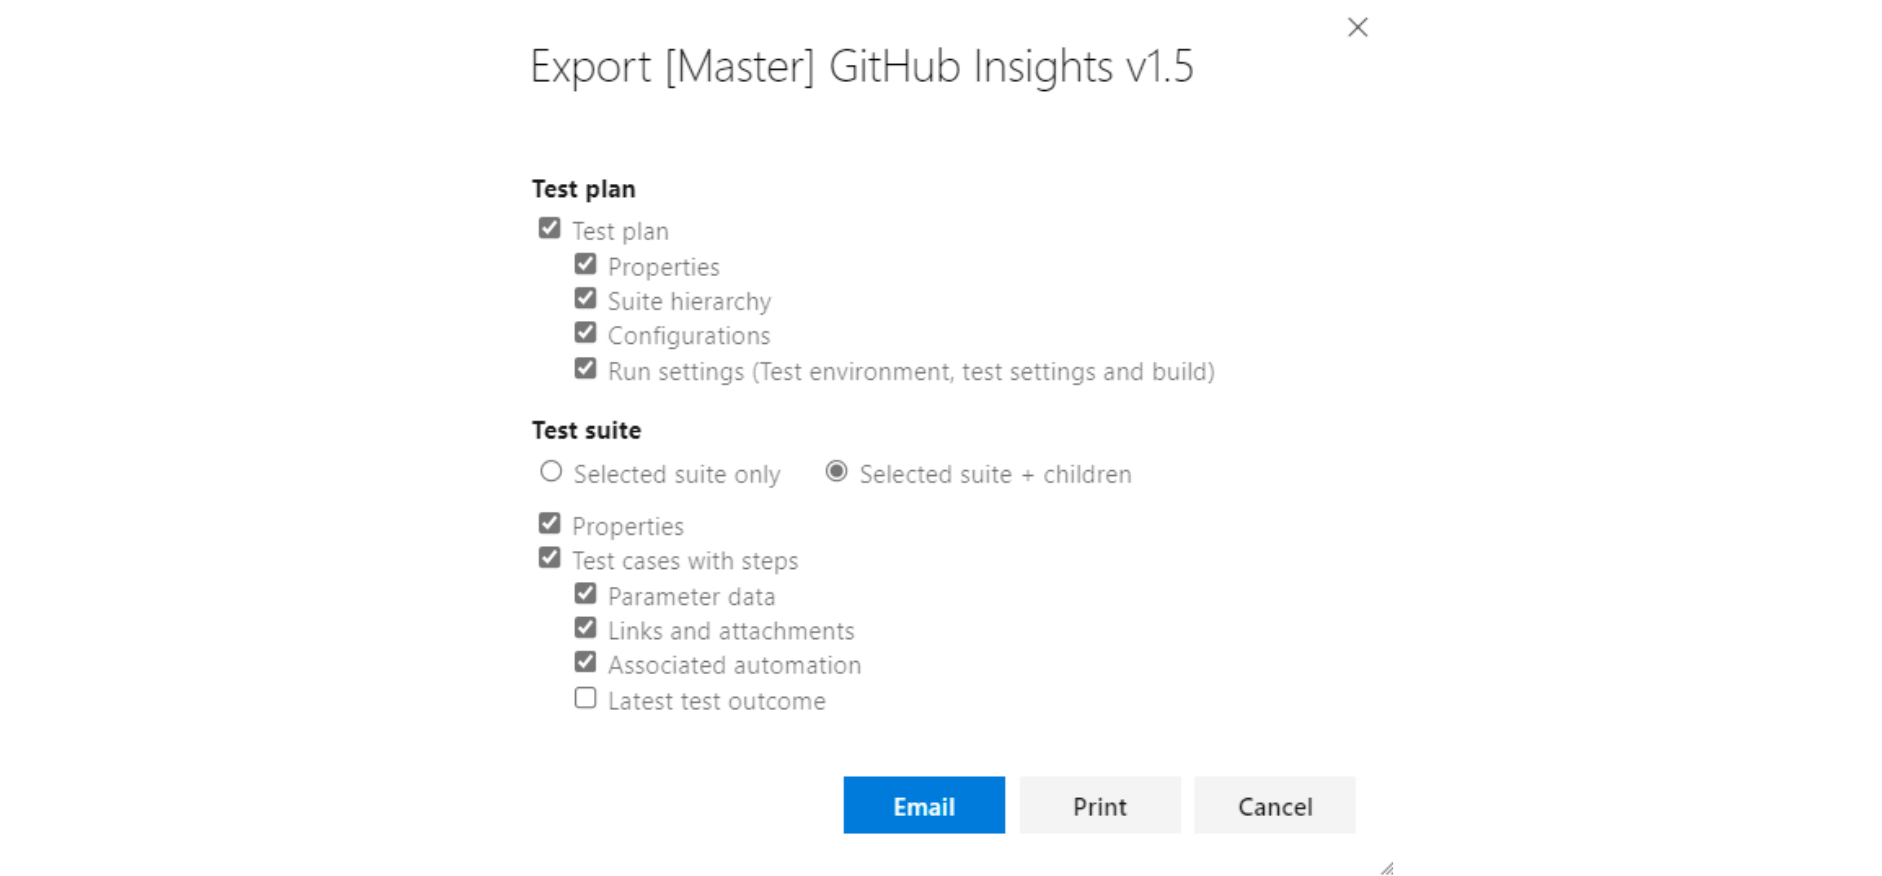
- Export: You can export the properties of the test plan, the properties of test suites, and other details as either an email attachment or by saving them as a PDF document.
- Open: Allows you to customize the work item form for the test suite, granting the user complete control over the work item fields.
- Assign a user (developer/QA) to run all tests: This feature is highly valuable for User Acceptance Testing (UAT) use cases in which multiple testers from various departments can execute identical tests.
- Rename/Delete: You can use these options to manage the suite’s name or to remove both the suite and its contents from the test plan.
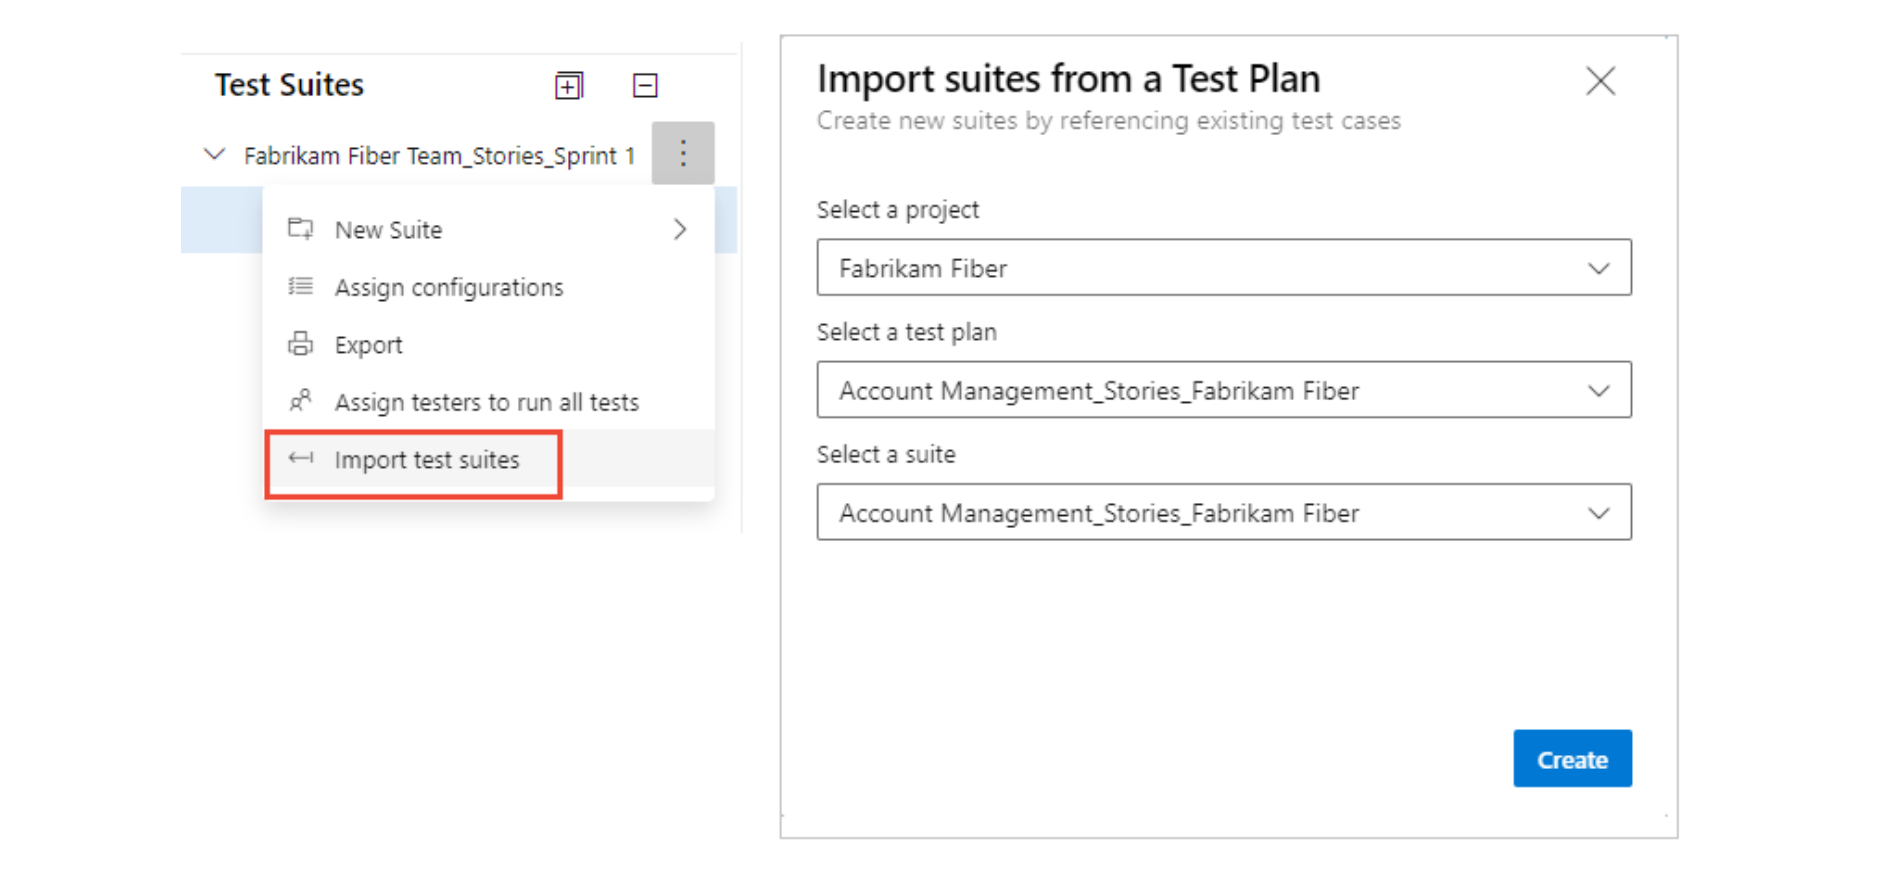
- Import test suites: This option helps to bring in test cases located in different suites within the same project or even from other projects.
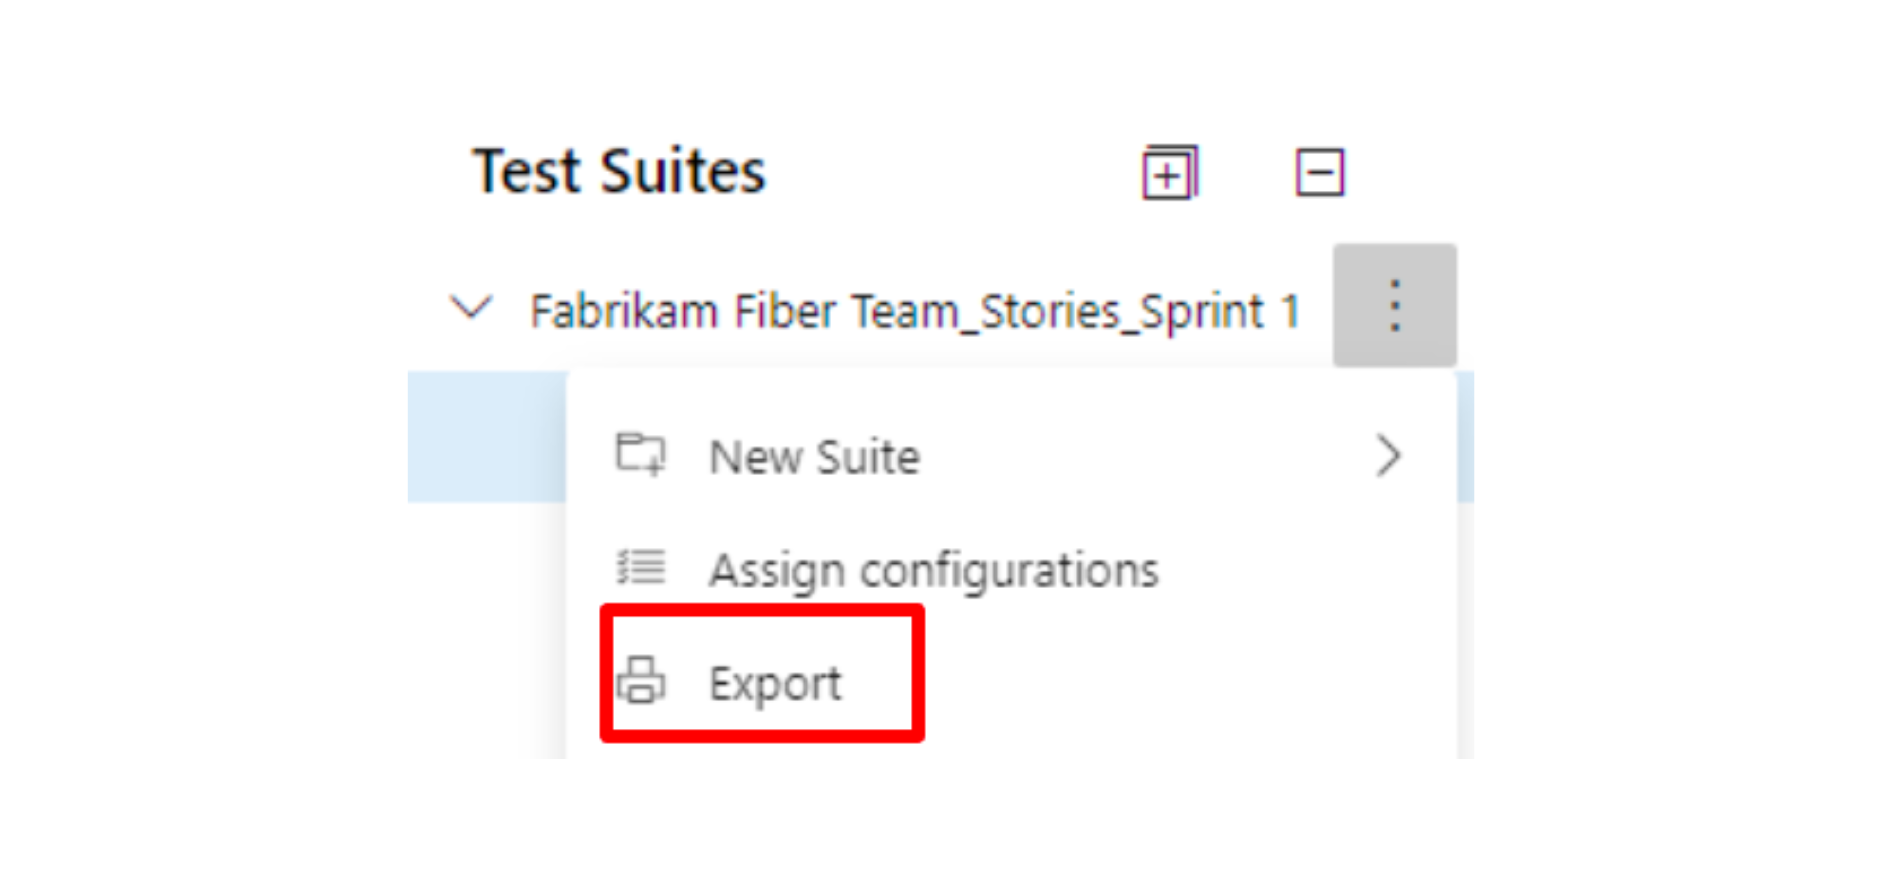
Export Test Suite
Exporting in Azure Test Plans is a valuable feature that simplifies the sharing and documentation of test-related information. Accessed through the Test Suites Tree, users can right-click on a specific Test Suite and choose the “Export” option from the context menu. This action allows the user to capture essential details, including test plan and suite properties, along with associated test cases and points, in a convenient email or PDF format. This flexibility ensures adaptability to various documentation needs.
Import test suites
You can have the option to reutilize the suites you’ve generated and include them in your current test suite. Moreover, you can bring it into the project, test plan, and test suite that contains the test you want to import.
Once you select the test suite, the structure of the chosen suite and its associated test cases will be imported into the current plan.
It is pertinent to mention that test cases are added as references, not duplicates or copies. Besides, it’s not possible to import test suites from within the identical test plan.
Organizing and Managing Your Test Cases
When organizing test cases there are mainly 3 steps define, execute, and charts.
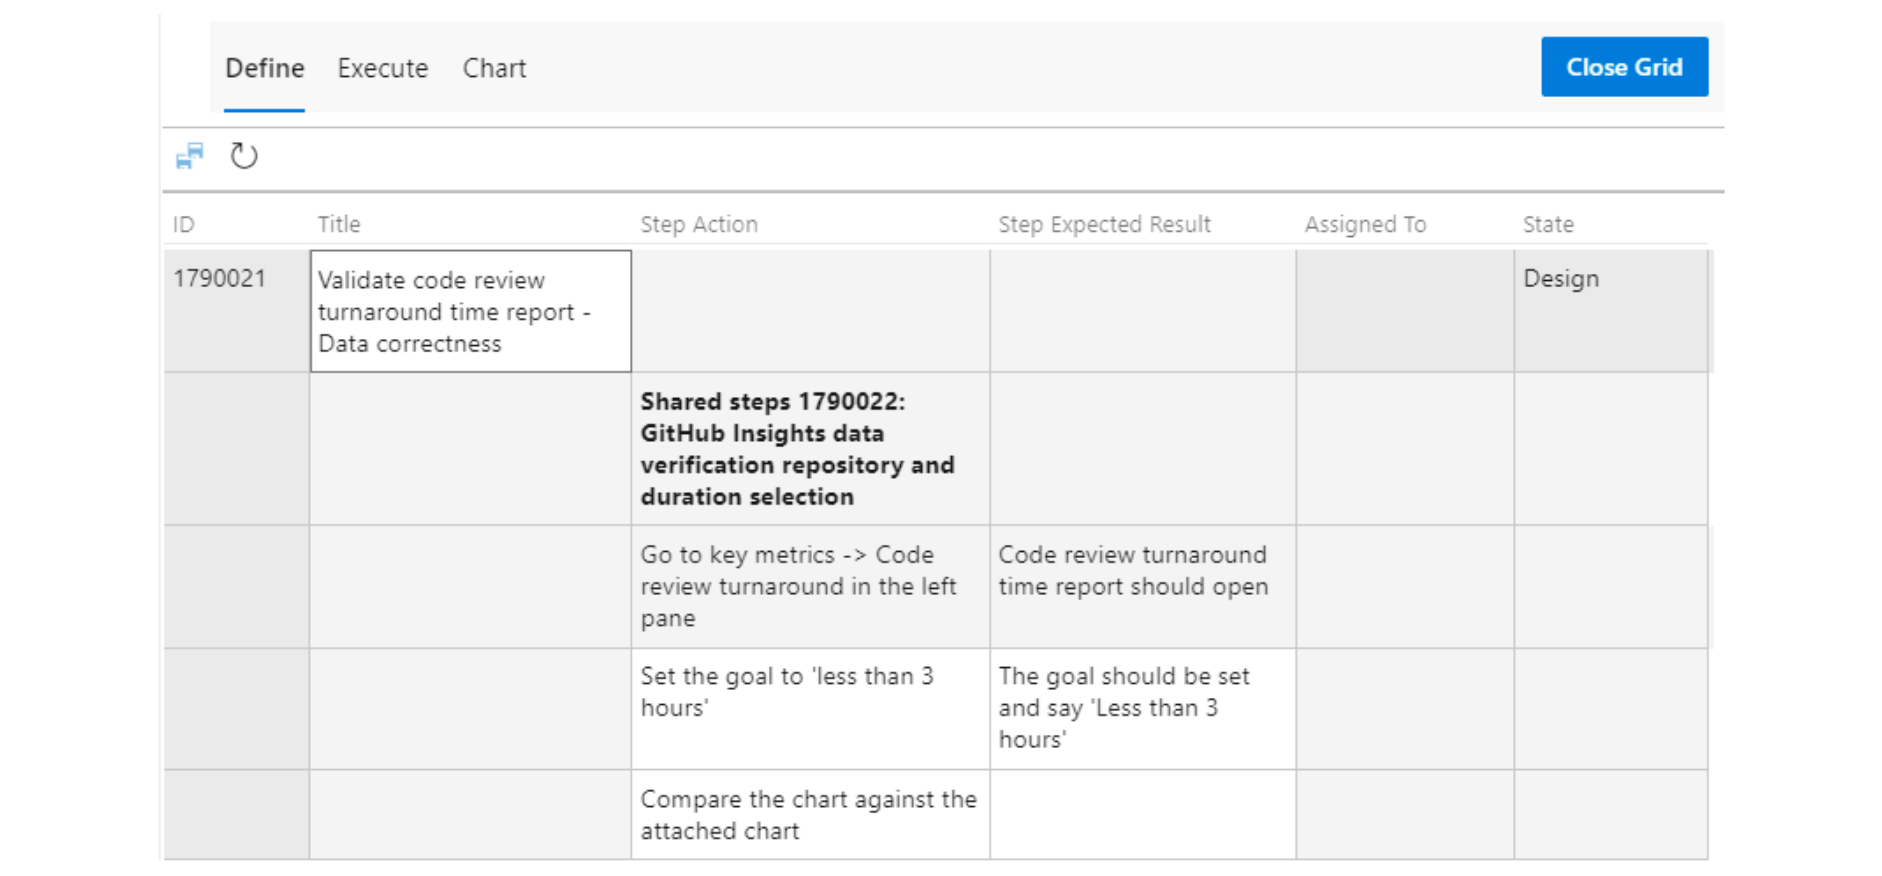
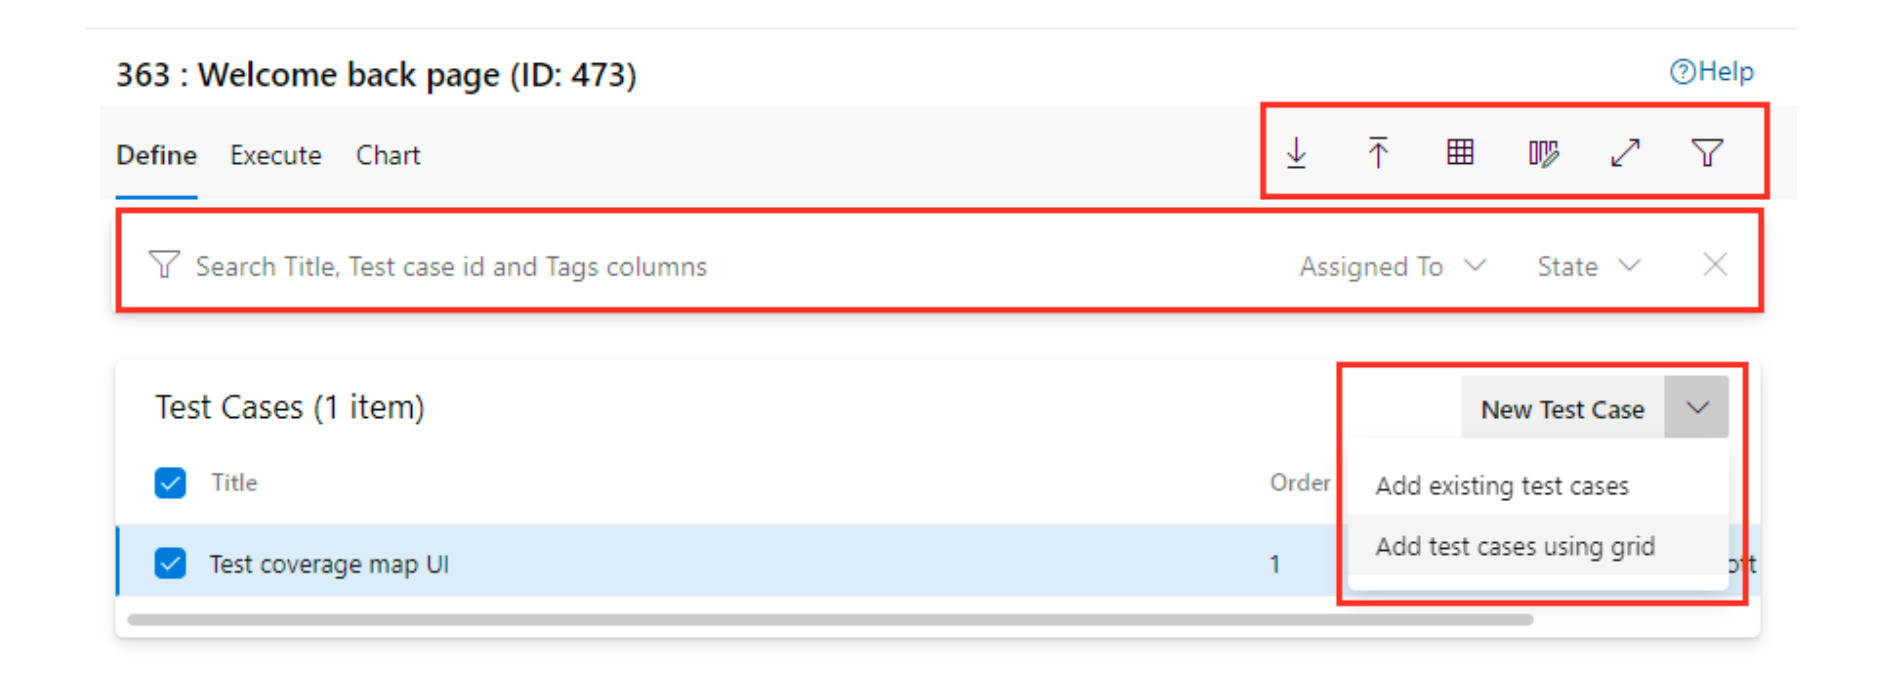 Define
Use the “Define” tab to collate, add, and manage the available test cases to a test suite. This tab allows users to do several tasks for test case management. They can create new test cases using the work item form and add them to the suite. Another option is adding existing test cases from a dialog. The grid view allows the quick creation of multiple test cases, automatically adding them to the suite. Users can also customize the order of manual test cases within a suite through drag-and-drop.
Execute
Use the “Execute” tab to allocate test points or run tests.
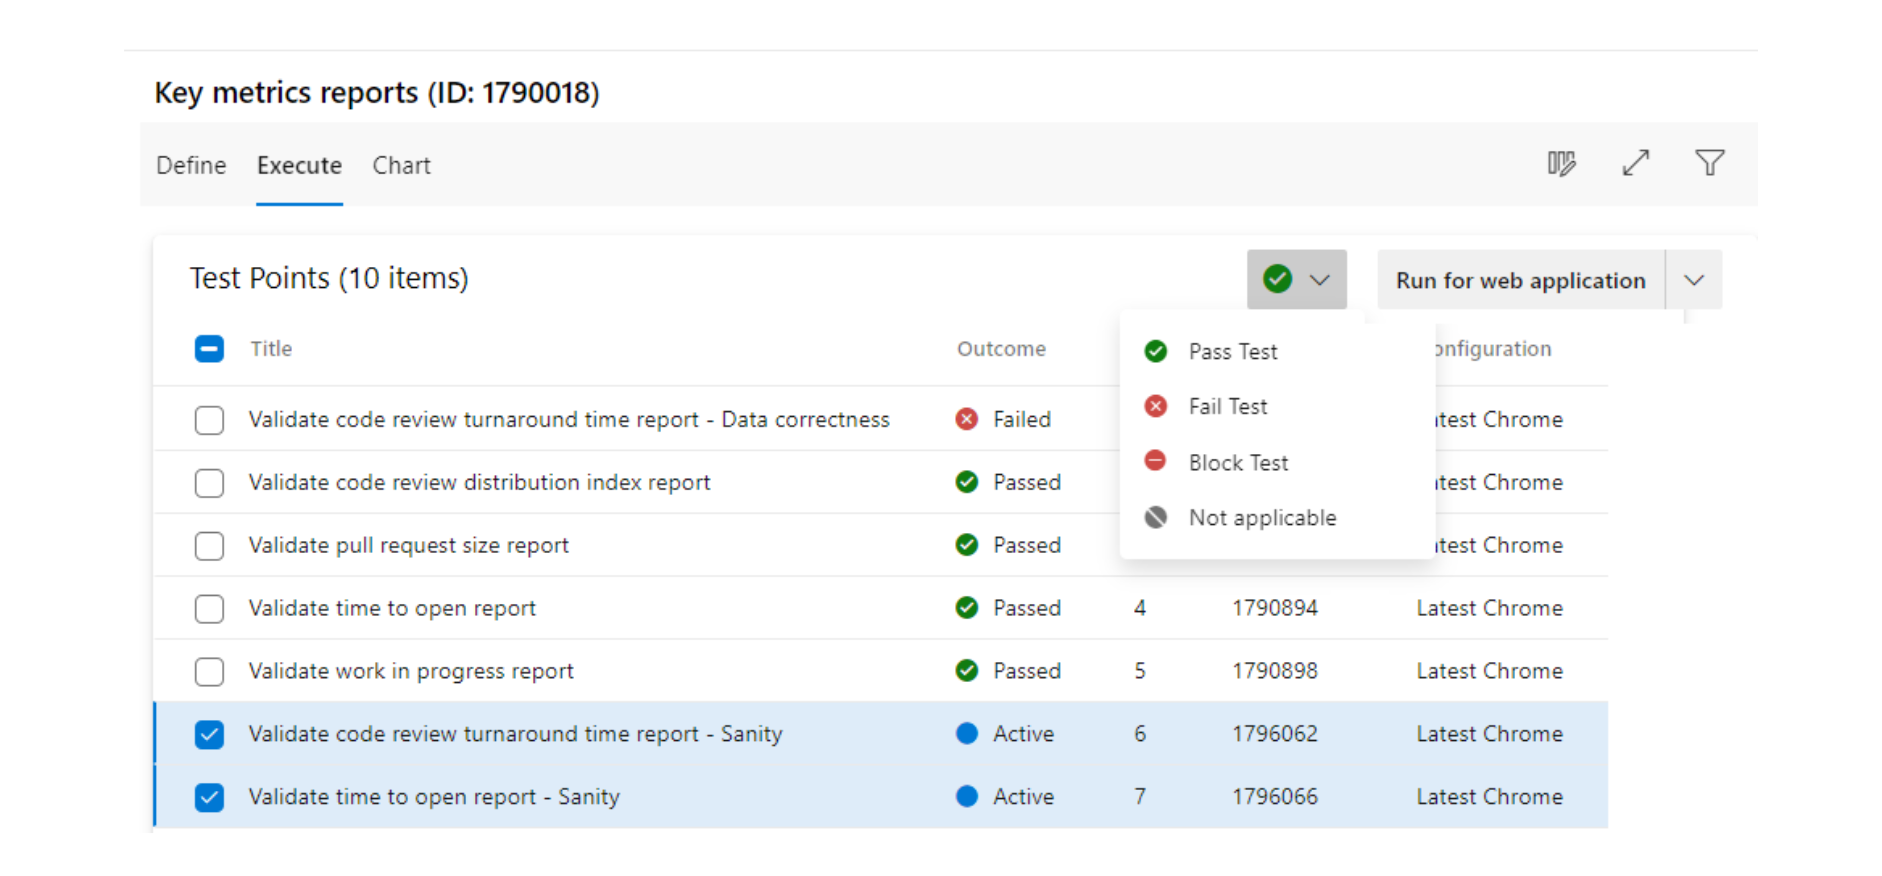
So, what’s a “Test point” exactly? Well, test cases can’t be run on their own. When you add a test case into a test suite, it makes a test point. A test point includes a mix of test suites, test cases, configurations, and a tester. For example, if you have a test case like “Test checkout process” and you add two setups for Microsoft Edge and Chrome browsers, you end up with two test points.
You can easily run each of these test points, and that’s when results show up. On the “Execute” tab, you get the latest details for the test point. Running these test points helps figure out how good a product or service is during development.
Chart
Use the “chart” tab to create various test cases or test result charts. These charts can be used for tracking and visualizing various aspects of testing progress. Users can create charts to monitor test cases or test result status, providing a quick overview of planned tests or ongoing testing efforts. The flexibility extends to creating customized charts, such as pie charts or stacked bar charts, to suit specific team needs. Also, users can share these charts on their team’s dashboard, ensuring that the entire team stays updated about testing metrics.
How to choose a test plan?
Below are the steps you can follow to choose a test plan in Azure DevOps.
1. Sign in to your Azure DevOps account by providing your credentials.
2. Go to the “Test Plans” section of your Azure DevOps project. This section is usually found in the left-hand menu or through the “Test” tab at the top of the page.
3. In the “Test Plans” section, you’ll see a list of all the available test plans. These plans are organized by folders. You can click on these folders to view the test plans contained within.
4. Click on the test plan you want to work with. This will open the test plan and allow you to view its details and associated test cases.
5. Inside the test plan, you can navigate through the various sections like test suites, test cases, test runs, and results to manage and execute your tests.
6. Depending on your role and permissions, you can create, edit, or execute test cases and test runs within the selected test plan.
Conclusion
Creating a test plan in Azure DevOps is a fundamental process for ensuring the quality and reliability of your software projects. By following the steps discussed in this article, you can easily create test plans in Azure DevOps that meet your project requirements and goals
By using Azure DevOps to create test suites, arrange your test cases, and carry out tests in an organized way, you’ll have valuable tools at your hand that help you monitor the quality of your software and make it better.
However, it is important to realize that the effectiveness of your Azure Test Plans not only relies on the tools but also on your testing strategy, collaboration, and the quality of your test cases.
To ensure the success of your testing efforts, it’s essential to regularly review and update your test plans and test cases to cater to constantly changing project needs and requirements.
SHARE:

