


On certain occasions during the performance testing process, it's possible to reach the load limit that can be generated by a single machine, either due to its hardware constraints or limitations of the load generation tool, in this case, JMeter.
When facing this situation, the way to proceed with performance testing is by distributing the load generation across multiple machines. A "Master" machine can control multiple remote "Slave" nodes, which are responsible for generating the load in a distributed manner, thus achieving a higher number of concurrent users.

Introduction
This technique can also be applied with virtual machines in the cloud, allowing for rapid scalability and, if necessary, execution from different geographic locations.
The objective of this guide is to provide clear and concise instructions on the necessary steps to perform distributed performance testing using the JMeter tool, both on Windows and Linux.
Components
Before starting with the configuration, here is the information on the main components of the execution.
The images below illustrate how the distributed execution works:
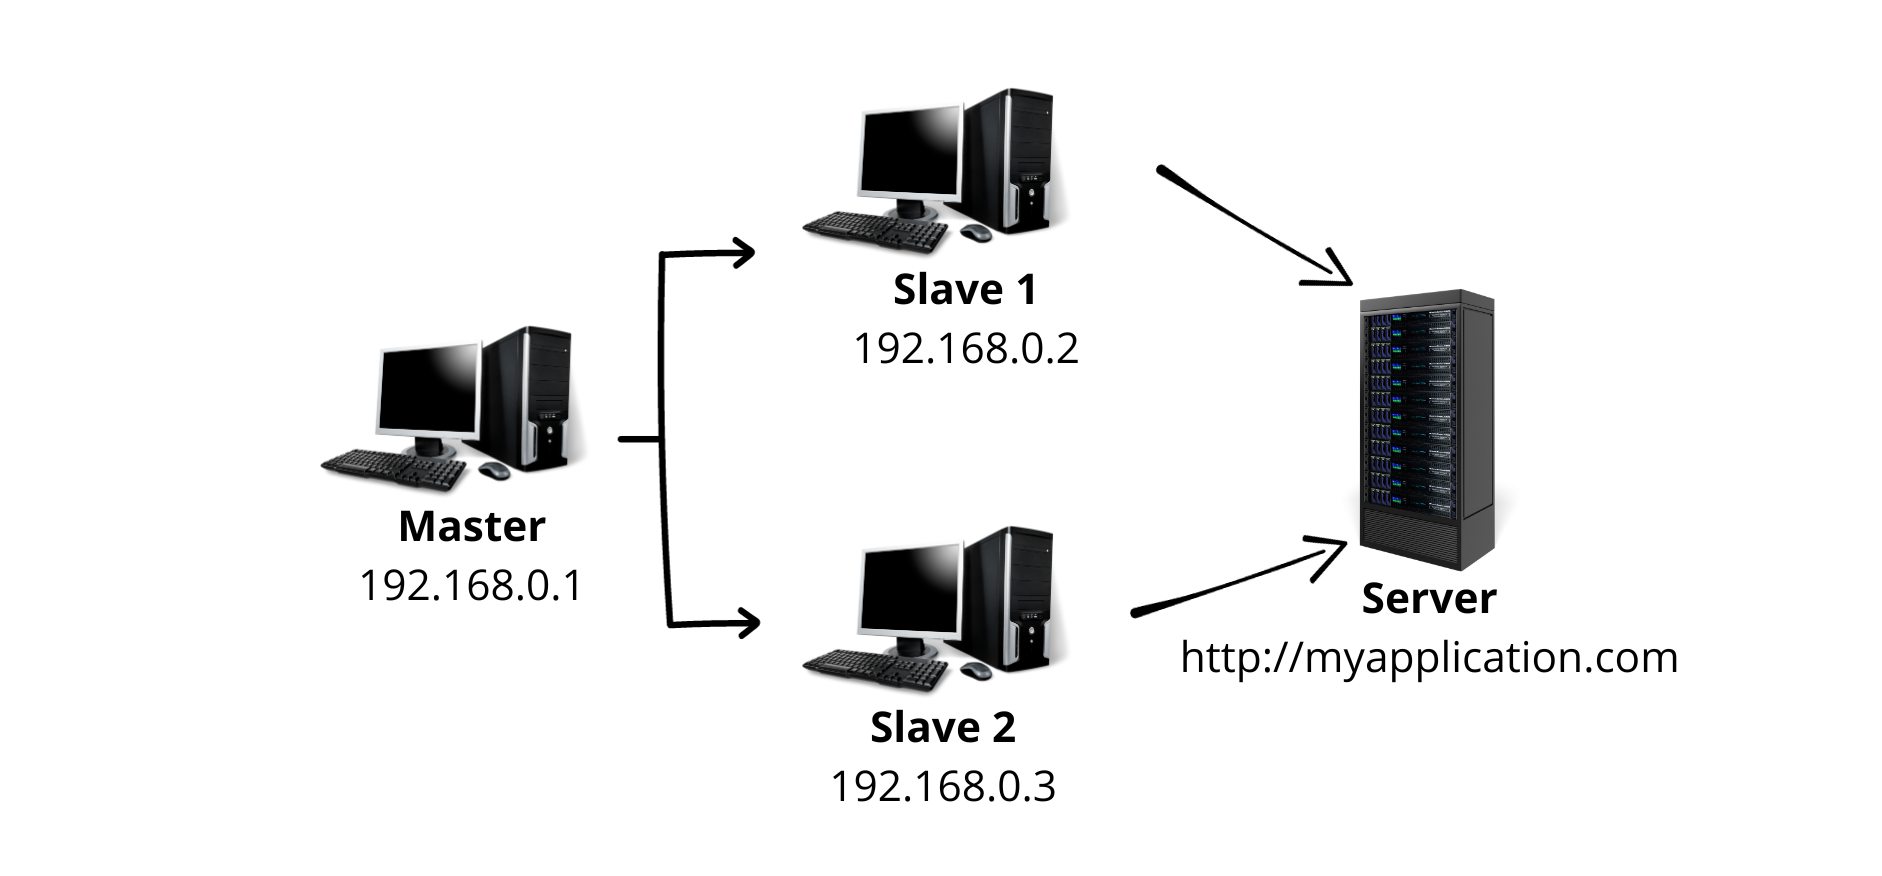
Master: The instance or machine from which distributed tests executed by other load-generating machines will be controlled.
Slaves: Instances or load-generating machines.
Previous steps
Before starting with the configurations for both the load generators and the master node, certain validations need to be performed:
Versions
The first thing to check is that the nodes (Master and Slaves) have the same versions of JMeter and Java installed.
JMeter
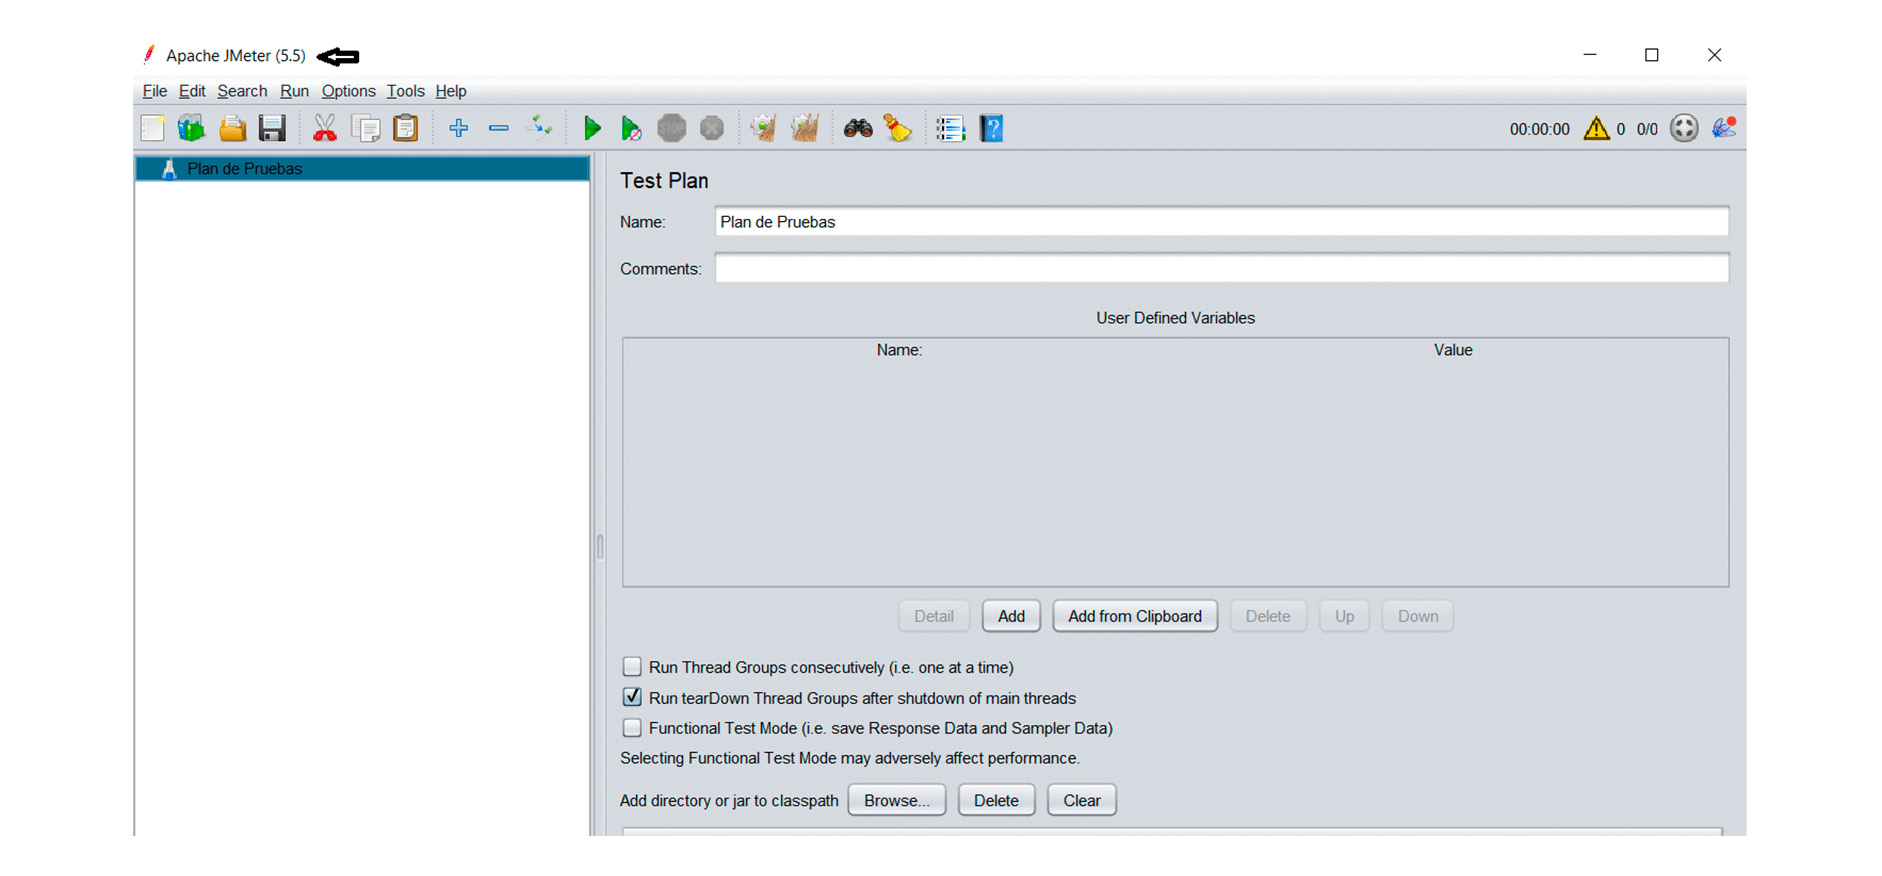
To check the JMeter version on the machine, run the tool by opening the ApacheJMeter.jar file located within the JMeter folder/bin. Then, when the application opens, verify the version displayed next to the name in the upper-left corner, as shown in the image below.
If you don’t have a graphical interface, from the terminal, and located in the directory where JMeter is installed, execute the command jmeter -v, and you should see something similar to the following screenshot.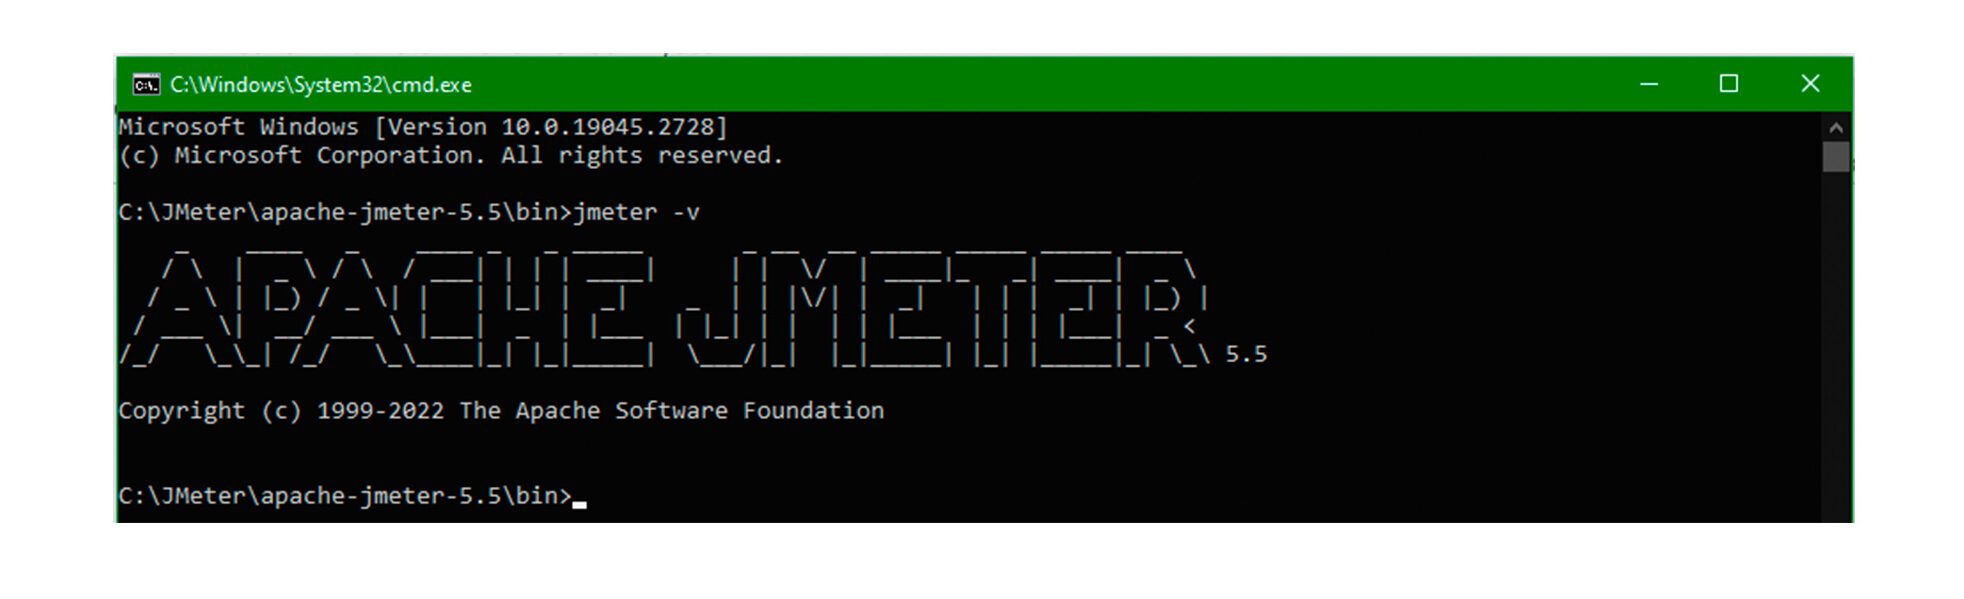
Java
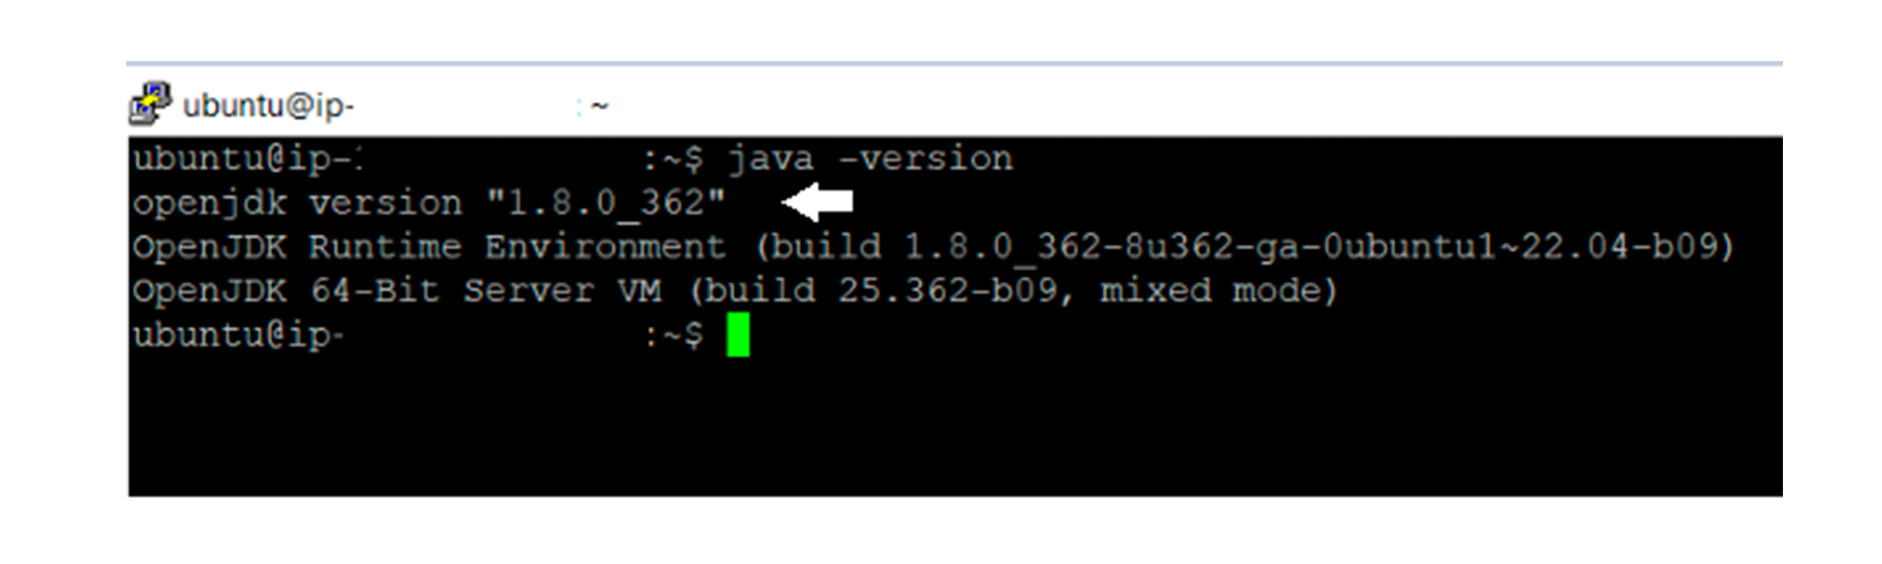
To check the Java version, run the command java -version from the terminal.
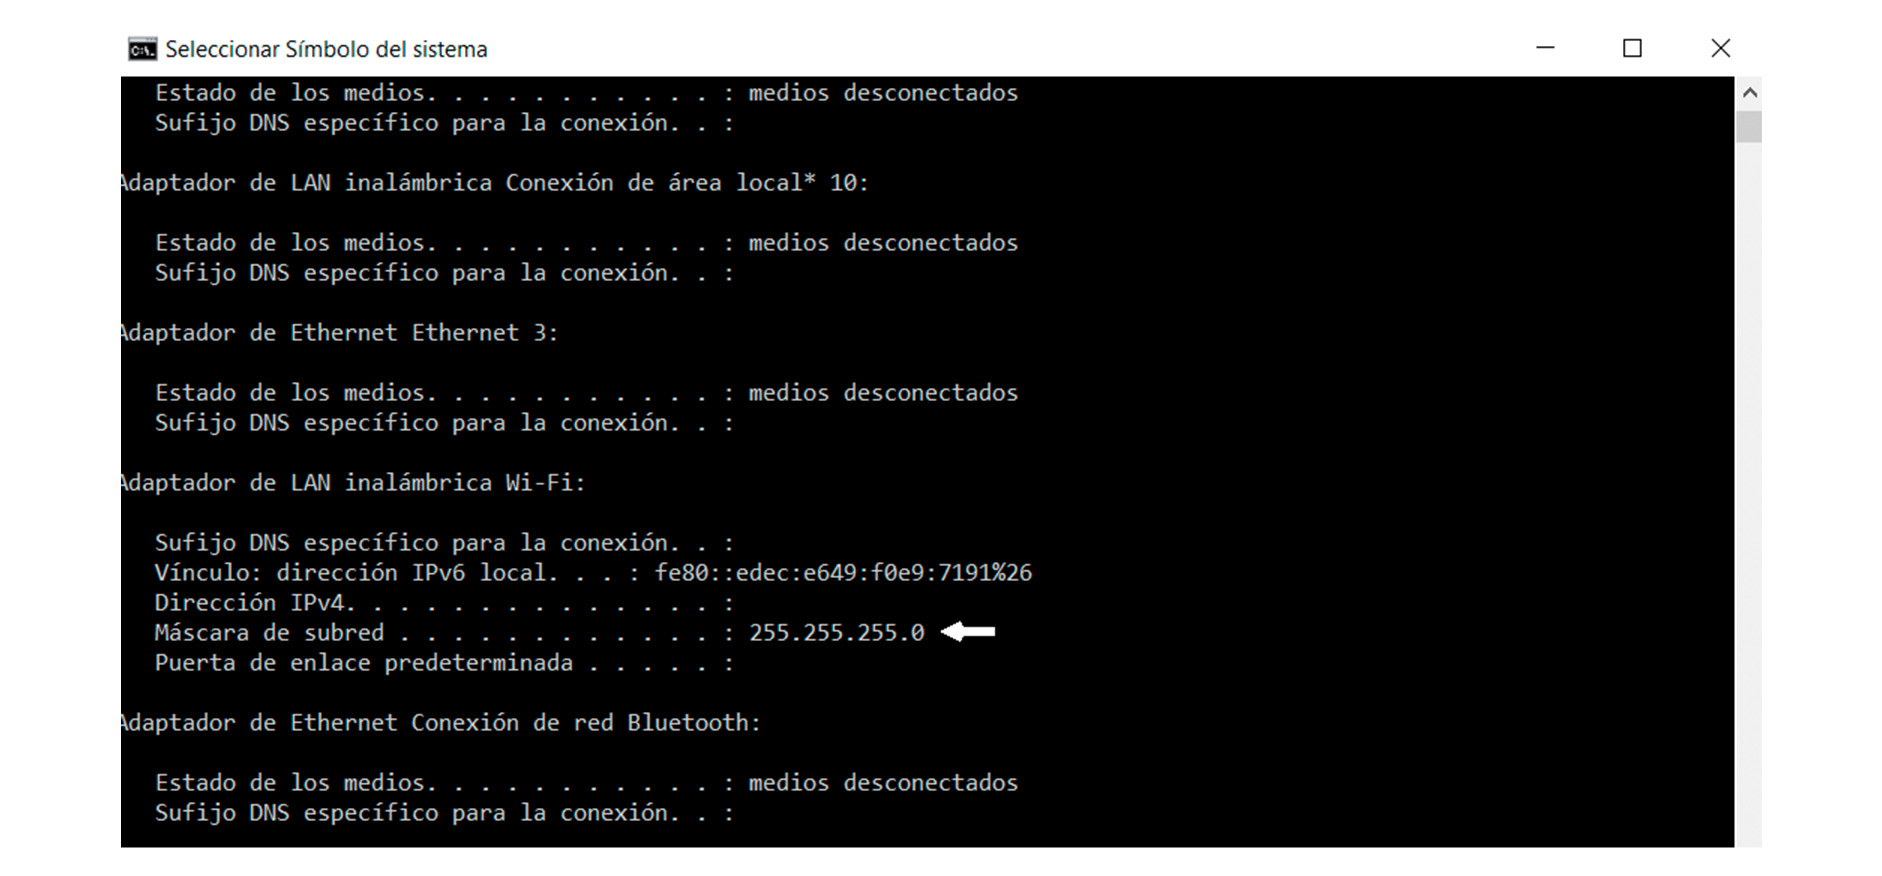
Subnet Verification
In order to use distributed test execution, it is necessary to ensure that both the Master and the Slaves are within the same subnet. This is a requirement imposed by the tool.
To verify that the machines are within the same subnet, from the terminal on each of the machines, run the command ipconfig (or ifconfig on Linux) and check that the first nine digits under “Subnet Mask” are the same.
Firewall
Traffic through certain ports must be allowed, which are indicated later in the document.
SSL Configuration for RMI
RMI (Remote Method Invocation) is a communication protocol that allows a program in one Java Virtual Machine (JVM) to invoke methods on a remote object located in another JVM on a different machine.
In applications using RMI, SSL can be used to secure the connection between the client and the server.
To run distributed tests, JMeter provides a script to generate an RMI keystore containing a key and its corresponding certificate.
The script is located in the bin directory and is available for both Windows (named bin/create-rmi-keystore.bat) and Linux systems (named bin/create-rmi-keystore.sh).
After running the script (it is recommended to run it from within the directory), a pair of keys will be generated, which will be valid for seven days, with a default password phrase of ‘changeit.’
When you run the script, it will ask you some questions about names to include in the certificate. You can enter your own values as long as the keystore tool accepts them. This value must match the “server.rmi.ssl.keystore.alias” property, which defaults to ‘rmi.’
When using Linux, you will be prompted for a password.
Below is an example to successfully create the keystore:
$ cd jmeter/bin
$ ./create-rmi-keystore.sh
What is your first and last name?
[Unknown]: rmi
What is the name of your organizational unit?
[Unknown]: My unit name
What is the name of your organization?
[Unknown]: My organization name
What is the name of your City or Locality?
[Unknown]: Your City
What is the name of your State or Province?
[Unknown]: Your State
What is the two-letter country code for this unit?
[Unknown]: XY
Is CN=rmi, OU=My unit name, O=My organization name, L=Your City, ST=Your State, C=XY correct?
[no]: yes
After configuring the keystore, you should copy the file bin/rmi_keystore.jks to each server and client of JMeter that you want to use for your distributed testing setup.
If you do not wish to configure SSL for RMI, you can simply disable it by setting the server.rmi.ssl.disable parameter to ‘true’ in the jmeter.properties file, both on the Master and the Slaves.
JMeter Configuration
After performing the previous checks and configuring SSL for RMI, you need to configure the hosts to be used by the Master.
These hosts should be specified by extension within the jmeter.properties file.
- On the controller node acting as the Master, go to the jmeter/bin directory.
- Open the jmeter.properties file (using your preferred text editor).
- Navigate to the remote_hosts line.
- Add the IP address or hostname of each Slave node (separated by commas).
In the following example, 5 machines are specified as load generators. Four of them are specified by IP address, and one by hostname:
remote_hosts=192.168.0.10,192.168.0.11,esclava_3,192.168.0.13,192.168.0.14
Port Specification
To ensure proper execution of the script, the Master and Slave nodes must communicate with each other throughout the test.
Initially, the Master node must establish a connection with the Slave nodes and perform certain checks. Then it signals the start of the execution to all of them and finally indicates the end of the script execution. On the other hand, the Slave nodes must periodically report preliminary results during the test execution.
To enable this communication between nodes, JMeter uses various ports, which are assigned randomly by default at runtime. However, if you want to manually specify these ports, either to restrict traffic to these ports or simply to have greater control during execution, you should make the following configurations in the jmeter.properties file.
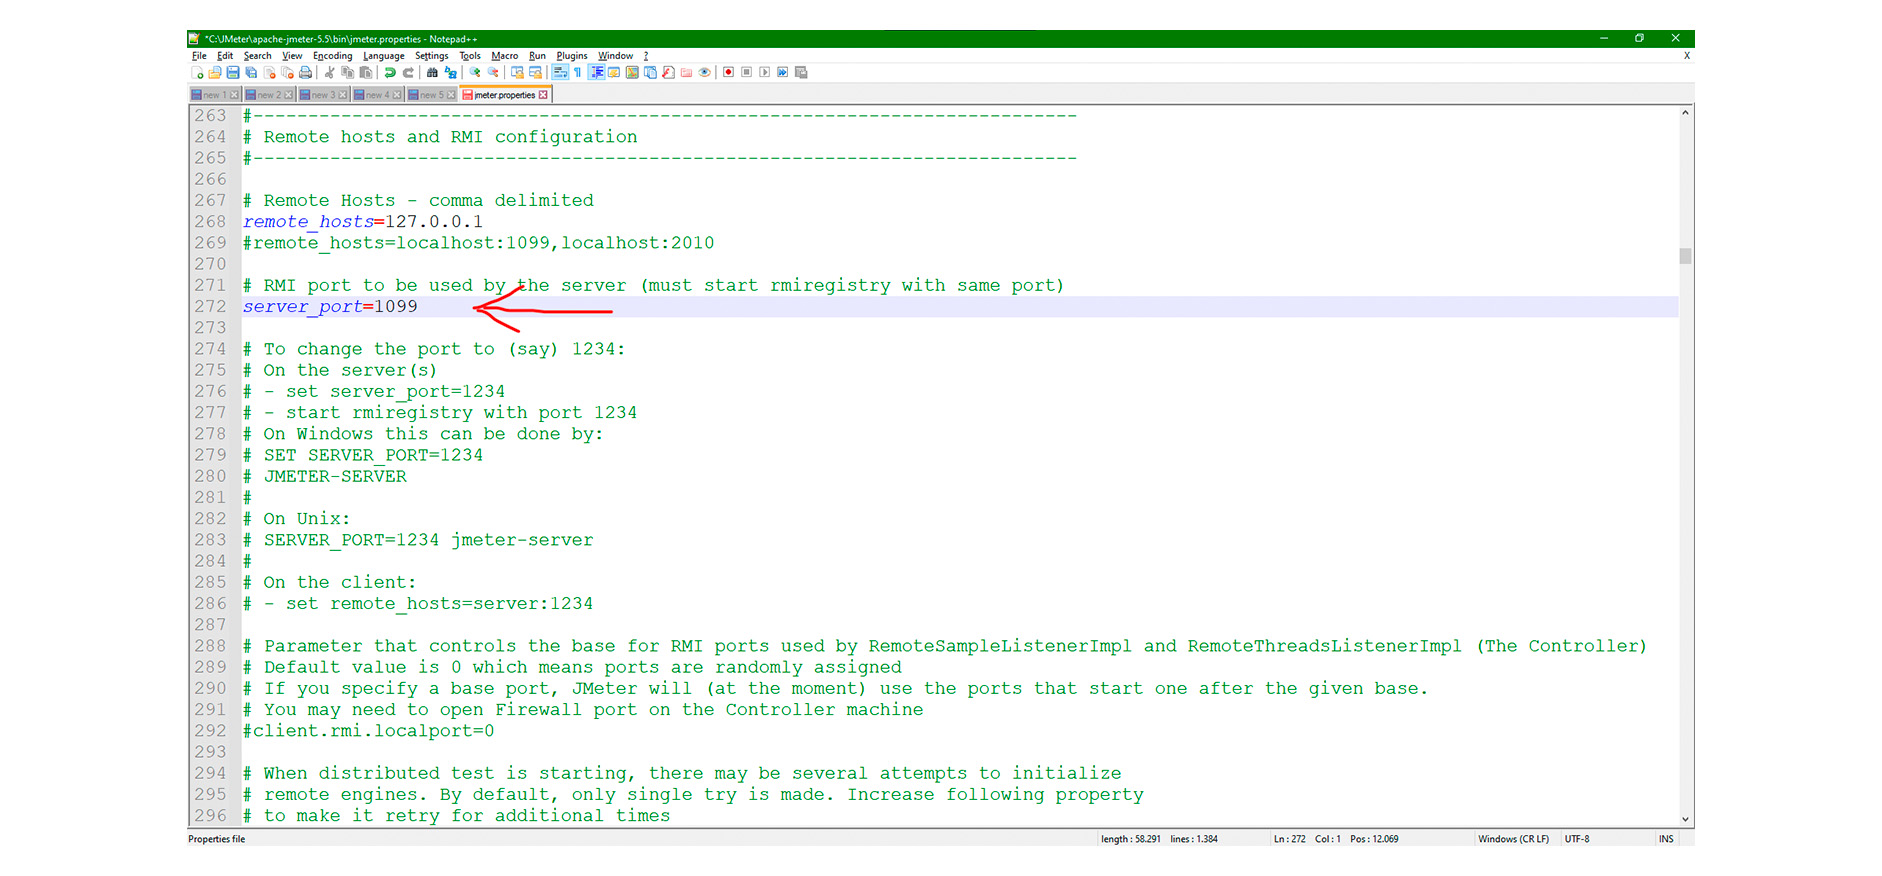
RMI Port
On the Slave nodes, search for the server_port parameter and specify the desired port as shown in the following screenshot:
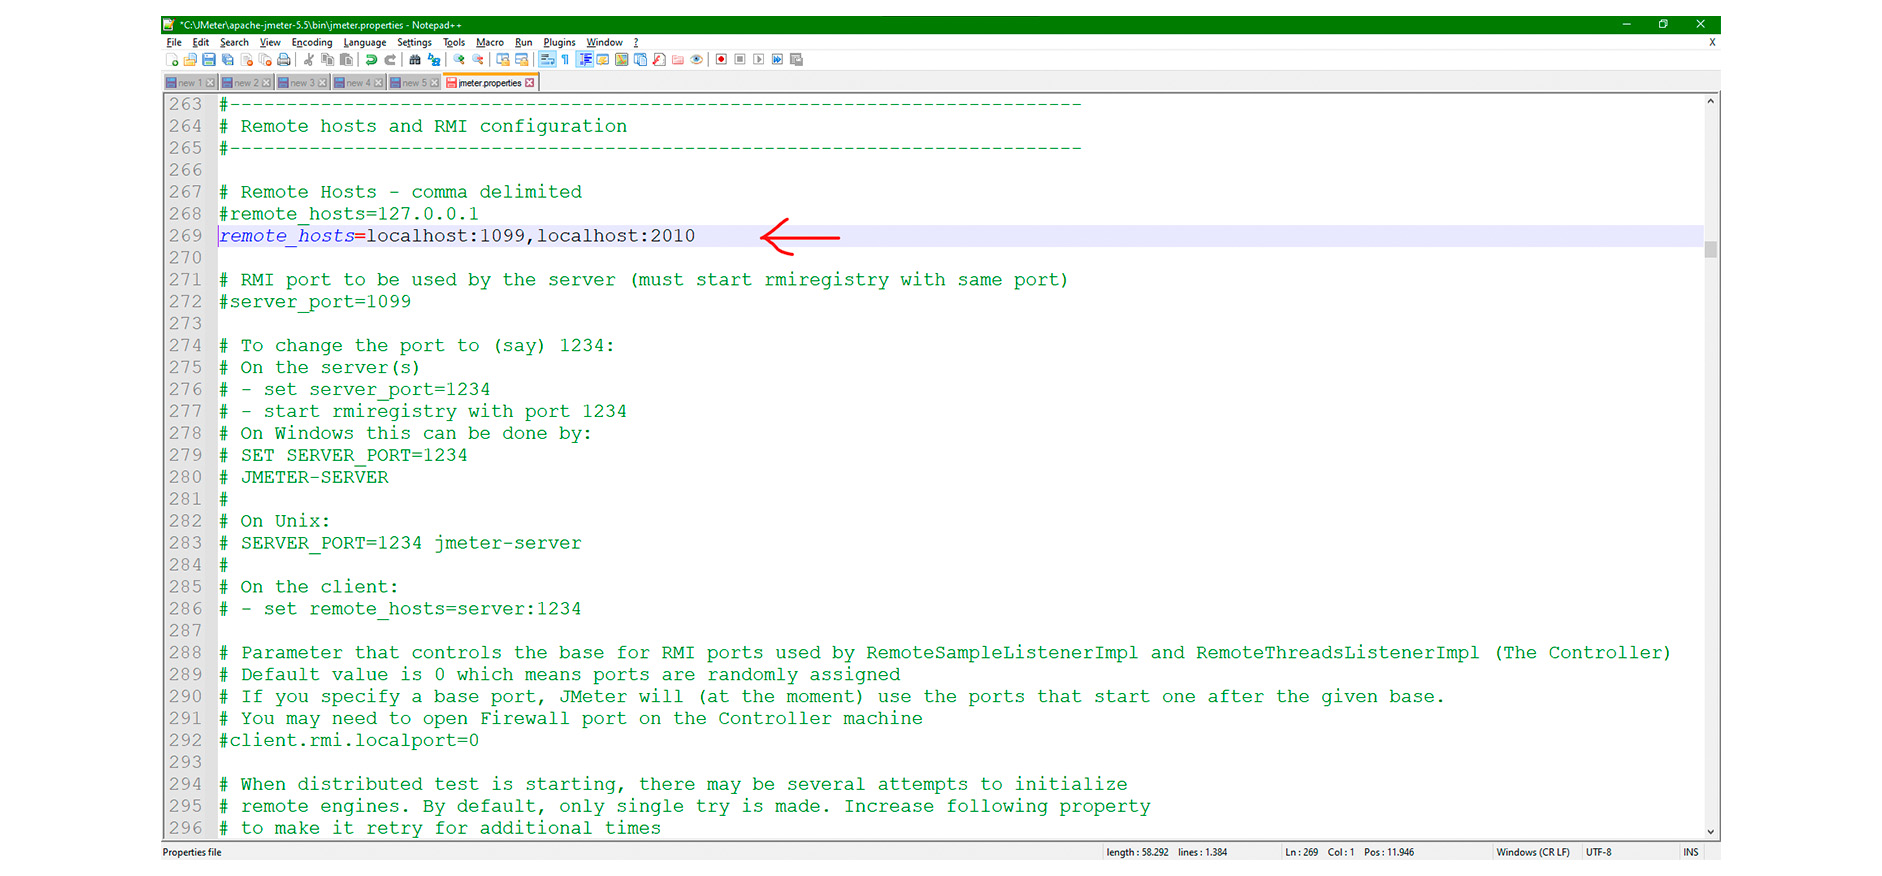
In the Master node, find the remote_hosts parameter and specify the port after the IP address or hostname as shown in the following screenshot:
Local RMI Client Port
In the Master node, look for the client.rmi.localport parameter and specify the desired port as shown in the following image:
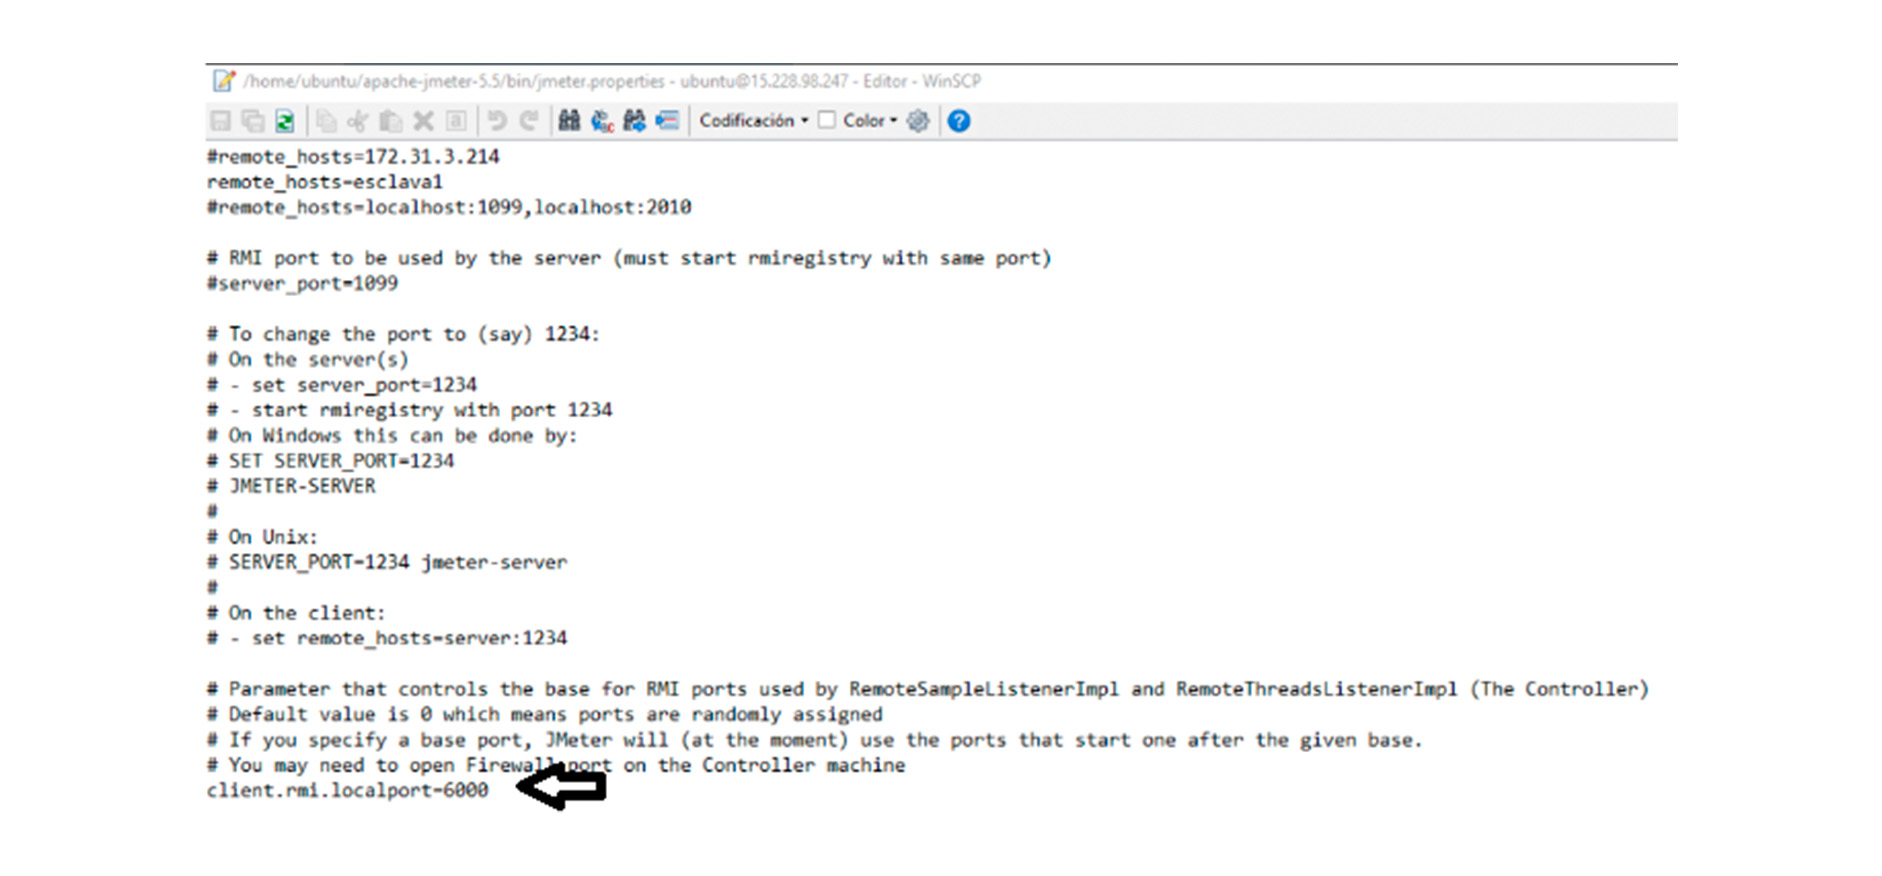
Keep in mind that JMeter uses the specified port and the following one.
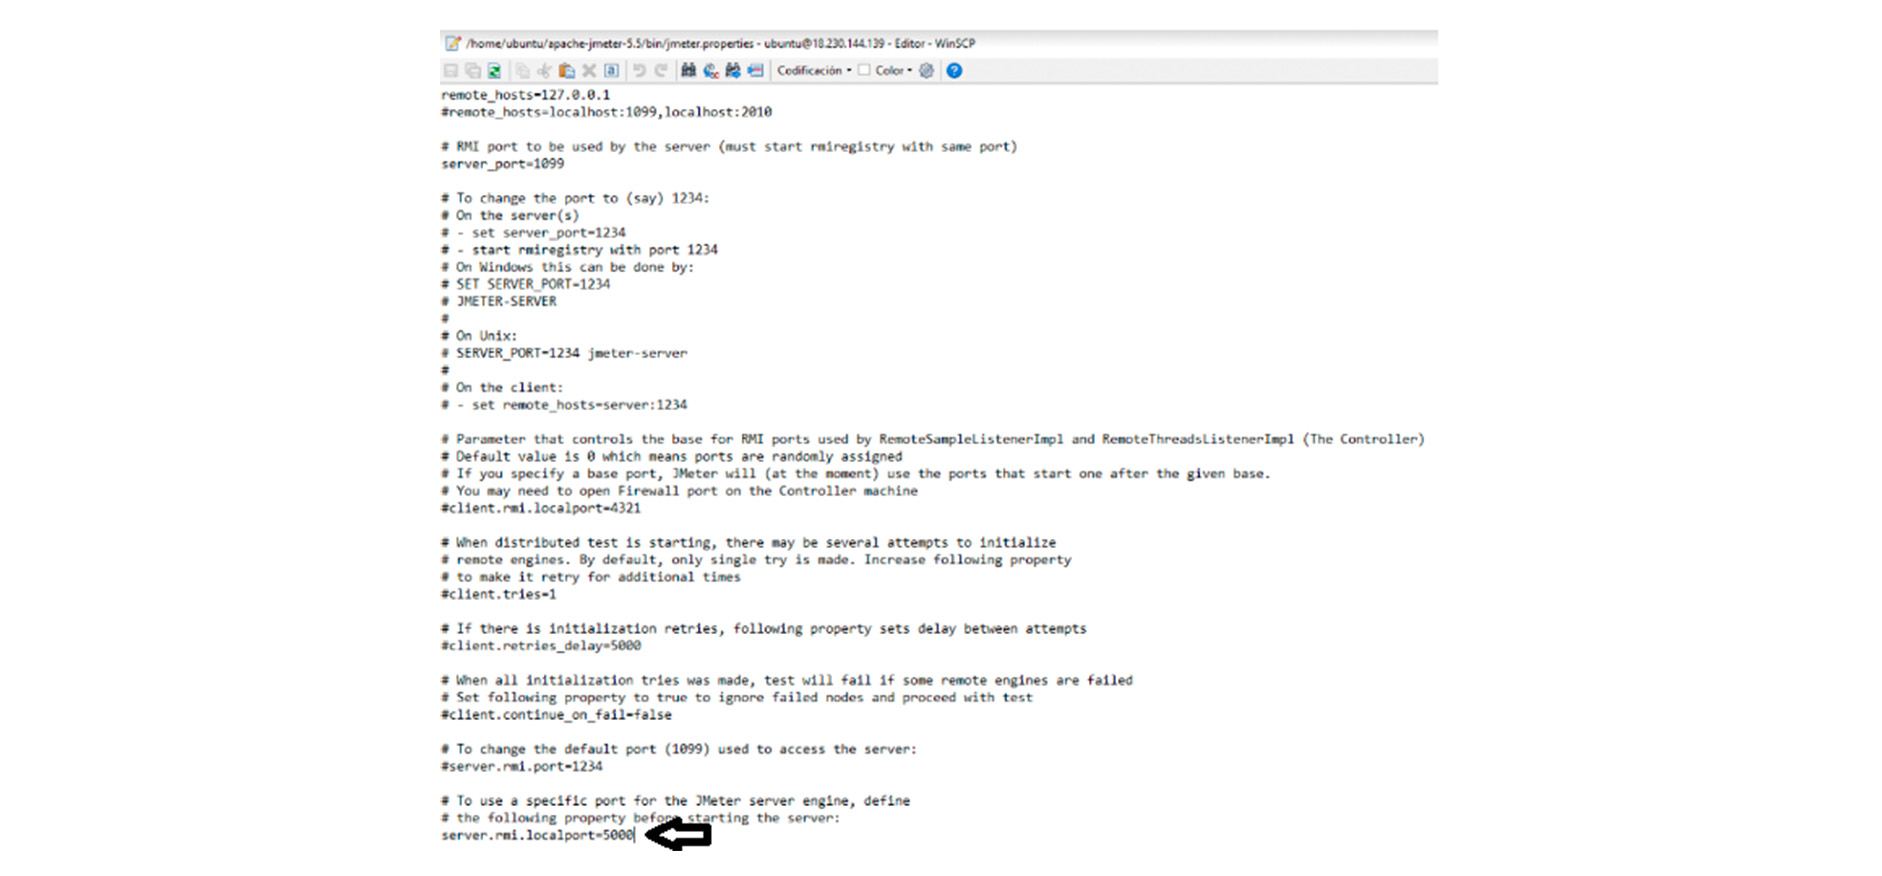
Local RMI Server Port
In the Slave node, locate the server.rmi.localport parameter and specify the desired port as shown in the following screenshot:
Distributed Execution
Before starting the tests, if possible, all the load generators should have the same accessible path (e.g., C:\JMeter\Script\ on Windows or /home/ubuntu/Script/ on Linux) so that script execution works smoothly. Otherwise, place all the necessary files for execution (CSV, images, etc.) inside the /bin folder of JMeter.
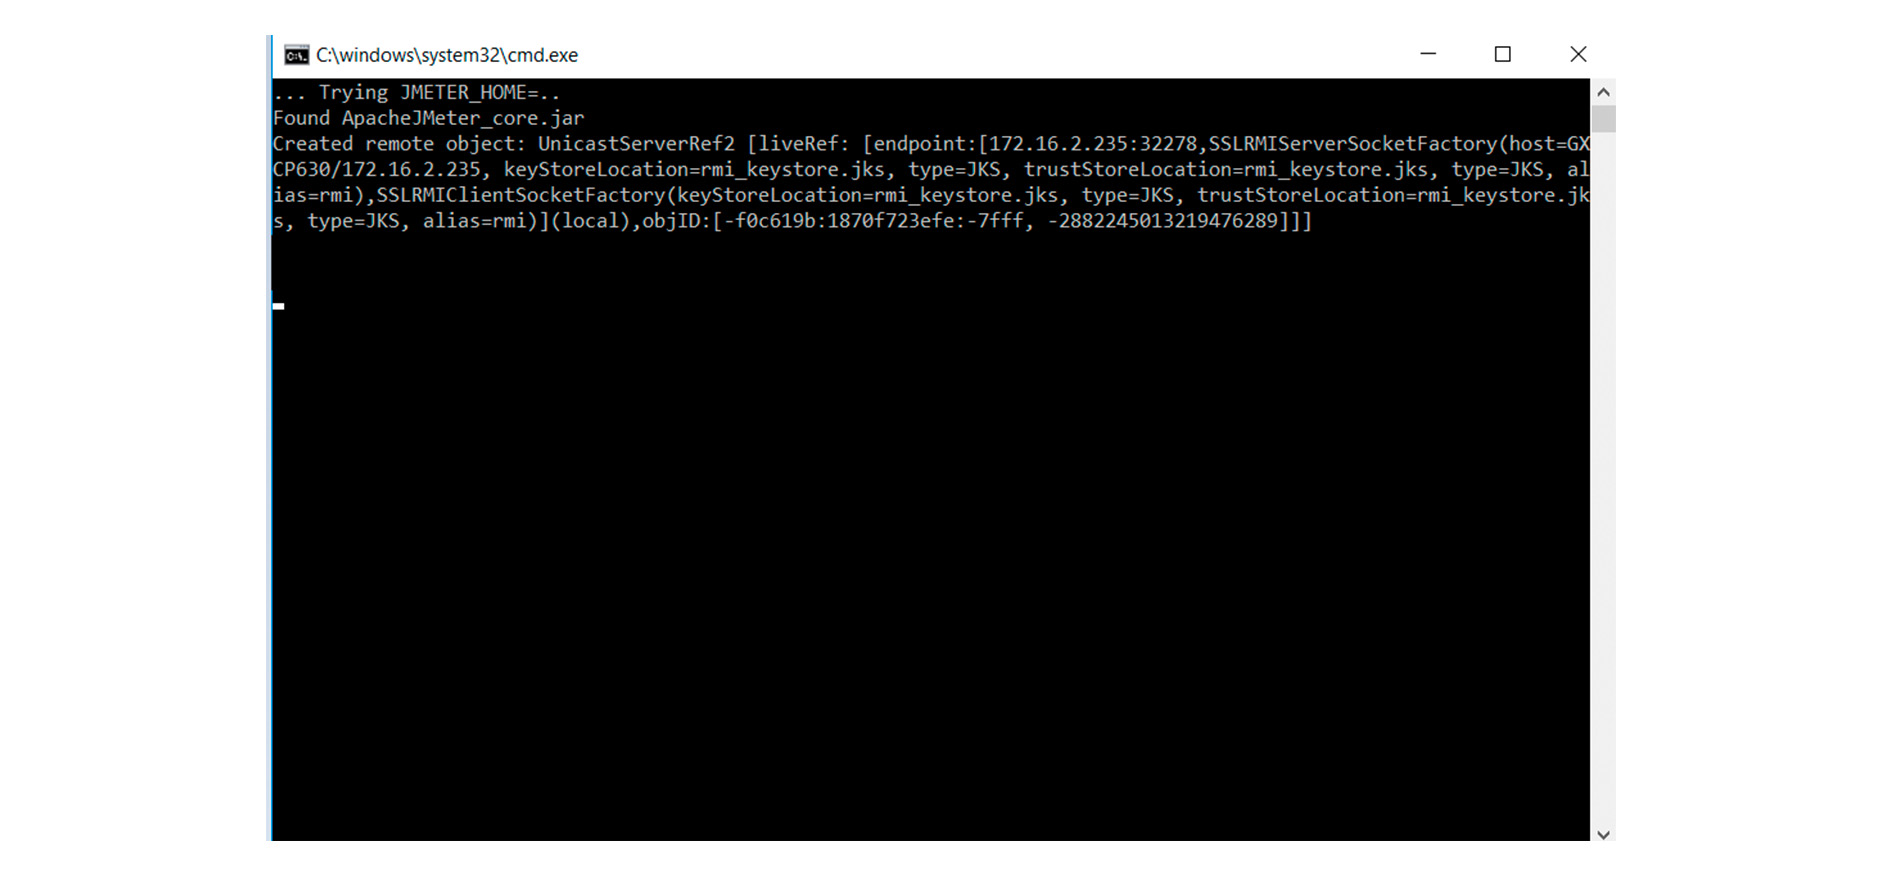
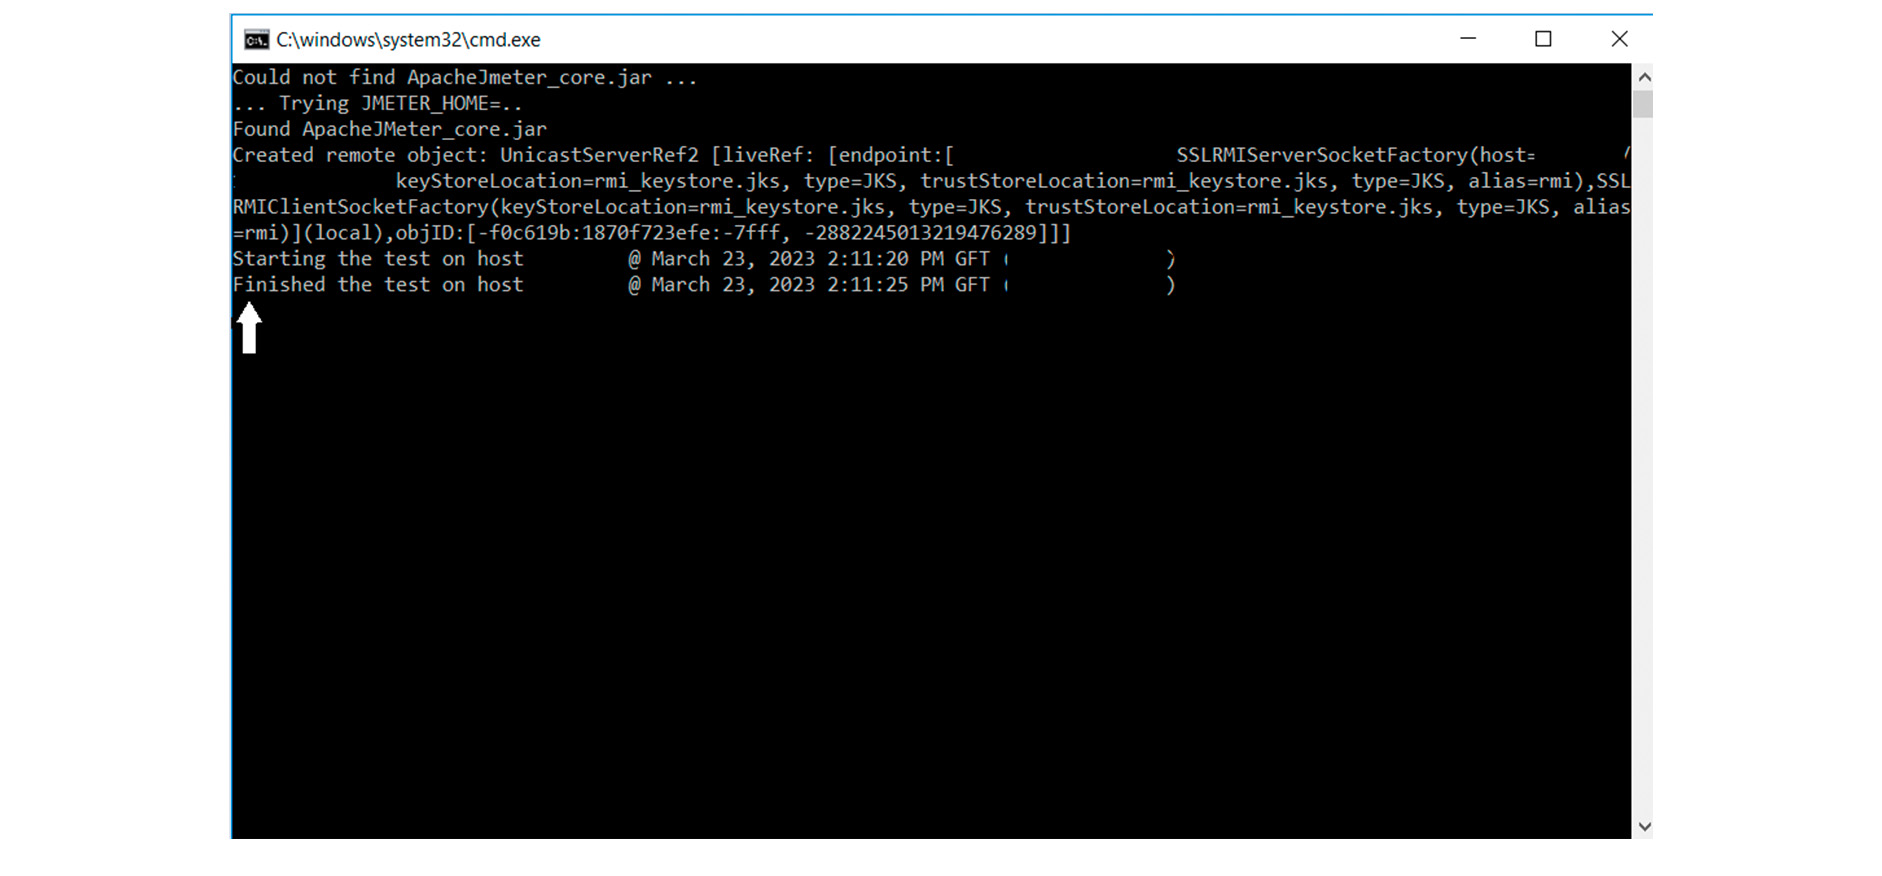
After completing and/or verifying all the previous steps, proceed to start the tests. Once everything is set up, execute the “jmeter-server” command on each of the Slave nodes to start the JMeter service in server mode.
On Windows, when you run jmeter-server.bat, if the process starts successfully, the terminal will appear as shown in the following image:
In Linux, the file to execute is “jmeter-server” and you may need to grant execution permissions for the “jmeter-server” and “jmeter” files.
From this point onward, the Slave nodes will be waiting to be instructed to start the tests.
Test start
There are different ways to initiate distributed execution. Firstly, for debugging or verification of correct configuration, you can use the GUI (Graphic User Interface).
Alternatively, for formal test execution, you can use the CLI (Command Line Interface).
GUI
To verify the correct configuration of all components, including the script itself, it is recommended to perform an initial run from the GUI if possible.
To do this, start JMeter in the usual way, open the Test Plan (.jmx file), go to the Run menu, and choose the Remote Start option. A menu with the remote hosts configured in the jmeter.properties file will appear. You can select one of them to verify the script’s correct operation with some debugging elements (such as View Results Tree or any other preferred Listener). Additionally, you should observe in the terminal where jmeter-server is running the start and completion of the script.
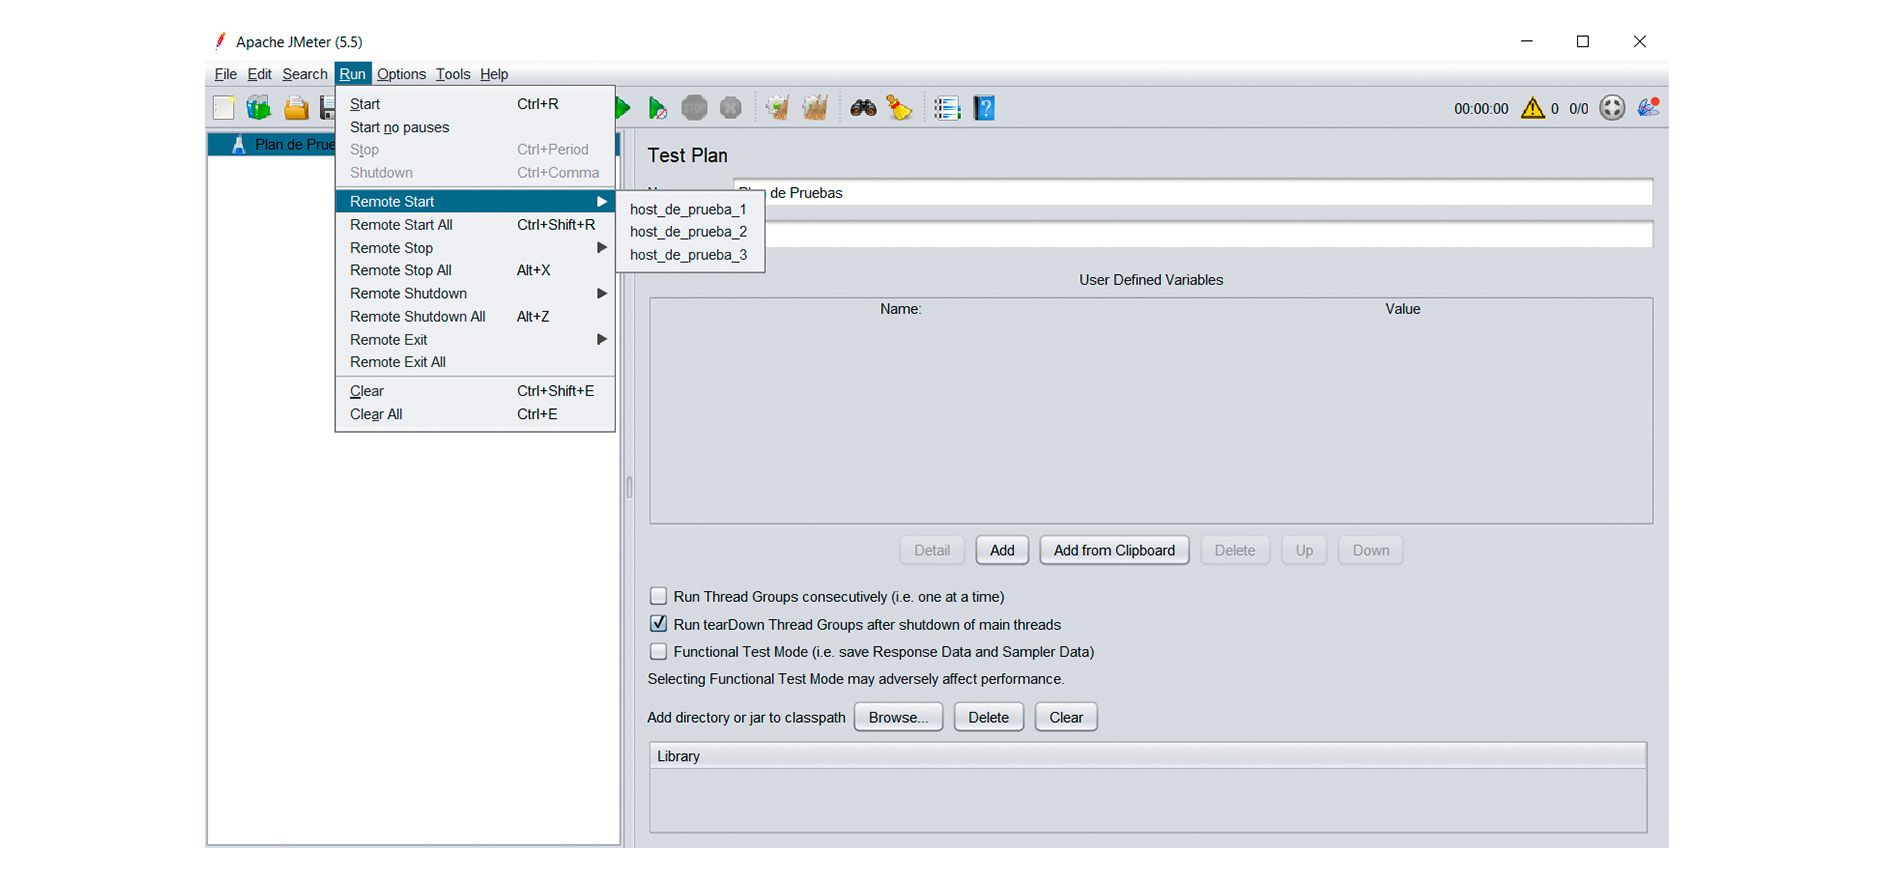
In the Run menu, you can also select the option “Remote Start All.” In this case, the execution will start on all the configured load generators listed in the jmeter.properties file.
It’s important to note that the Thread Group configuration applies to each of the load generators. In other words, if you have 3 Slave nodes and you run the script from the Master node configured with 10 users, each load generator will simulate 10 users, resulting in a total of 30 users.
CLI
If you have the correct configuration in jmeter.properties, simply add the “-r” option to the command line execution that you would normally use, for example:
jmeter -n -t <script_path> -r
The option “-r” takes all the slaves mentioned in the “remote_hosts” property.
Alternatively, you can specify the slave nodes at the time of execution using the “-R” option followed by the IP addresses or hostnames of the Slave nodes.
jmeter -n -t <script_path> -R server1,server2,…
Known Errors and Solutions
SSL Error on Linux Machines
On some occasions, SSL configuration errors may occur when setting up SSL for RMI on Linux machines. In these cases, a solution has been found by changing the keystore type.
To do this, you should generate a new RMI keystore (named rmi_keystore2) that allows you to work on this system:
- Open the terminal.
- Navigate to the /bin directory.
- Execute the following command:
keytool -importkeystore -srckeystore rmi_keystore.jks -destkeystore rmi_keystore2.jks -deststoretype pkcs12 -destkeypass <password>
- Now enter the password for your rmi_keystore2.jks.
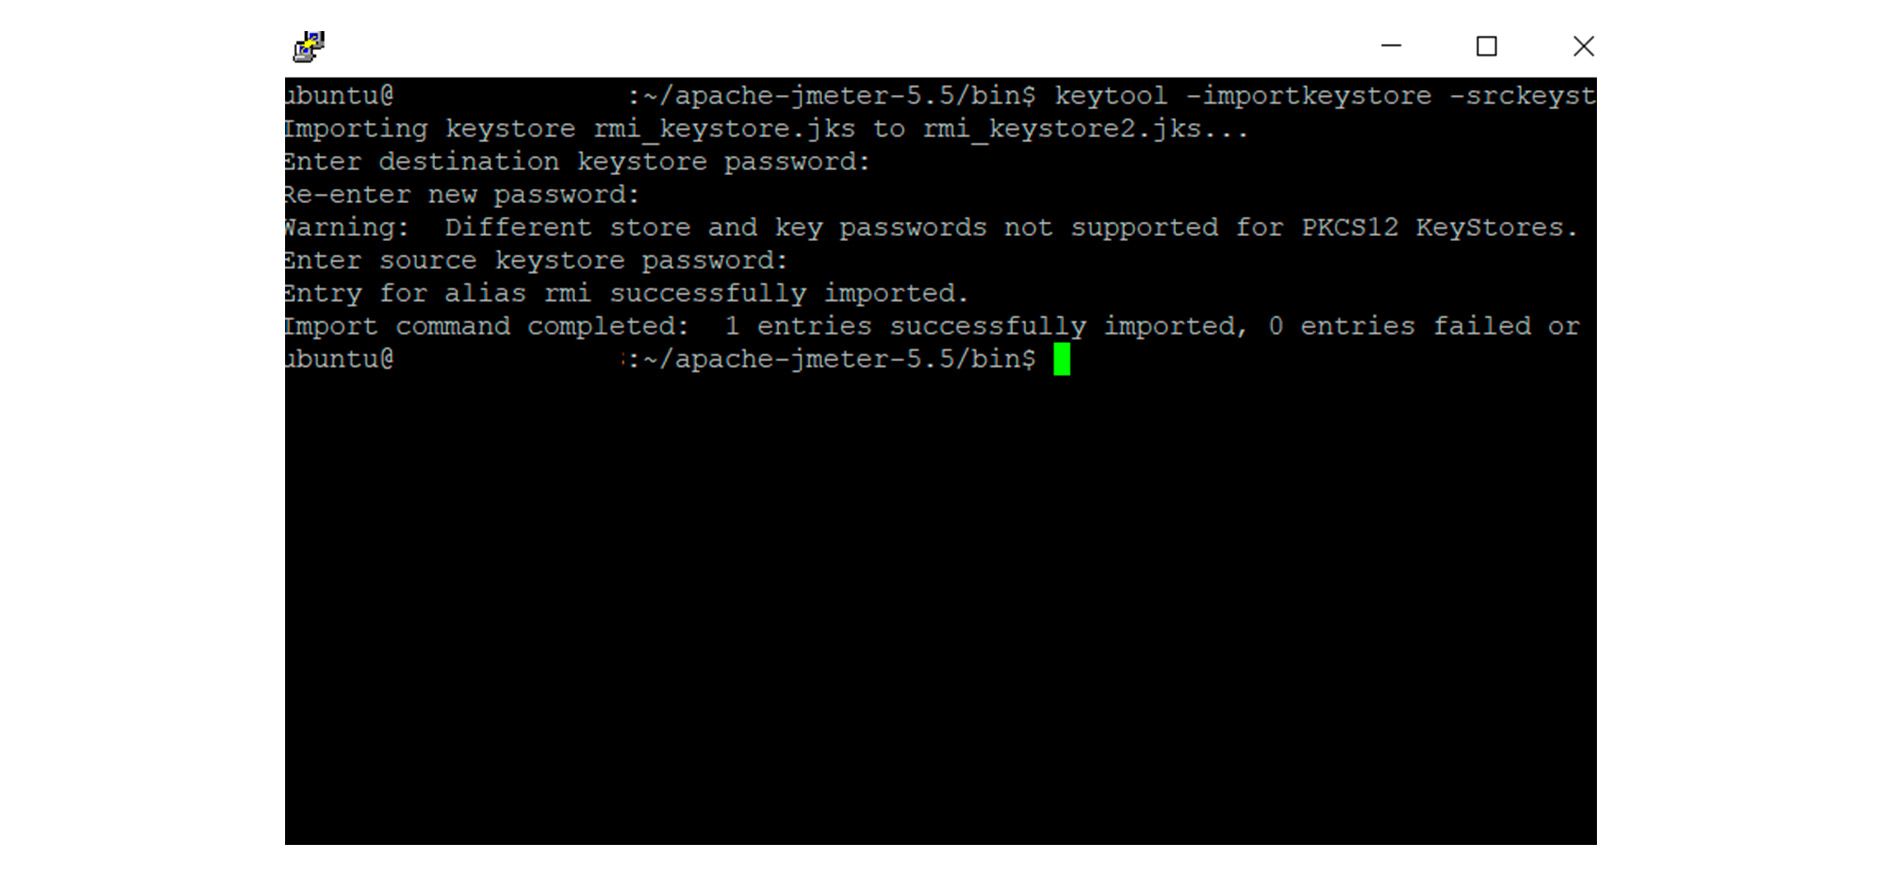 From this point onward, you will work with the rmi_keystore2.jks file. It is recommended to rename it to rmi_keystore.jks on the Slave nodes, just like the original.
Non HTTP response code
During test execution, when the load-generating capacity of the Slaves reaches its limit, exceptions such as the following may appear:
- javax.net.ssl.SSLHandshakeException/Non HTTP response message: Remote host terminated the handshake
- javax.net.ssl.SSLException/Non HTTP response message: Connection timed out (Read failed)
In such cases, it is recommended to have a larger number of Slave nodes and to use cloud-based machines while applying configurations for high concurrency.
Configurations for High Concurrency
Depending on the complexity of the script and the resources required to run it, the limit of a load generator can be at different levels of concurrency. With these configurations, a low-complexity script and machines with the following characteristics were tested to generate up to 25,000 active users per instance, with the capability to have up to 2 instances of jmeter-server running in parallel, achieving 50,000 concurrent users per AWS instance.
Slave instance type on AWS: r5b.12xlarge
RAM: 384GB
vCPU: 48 cores
Network: 10 Gigabit
If the execution infrastructure is deployed on AWS, both the master and the slaves should be in the same availability zone.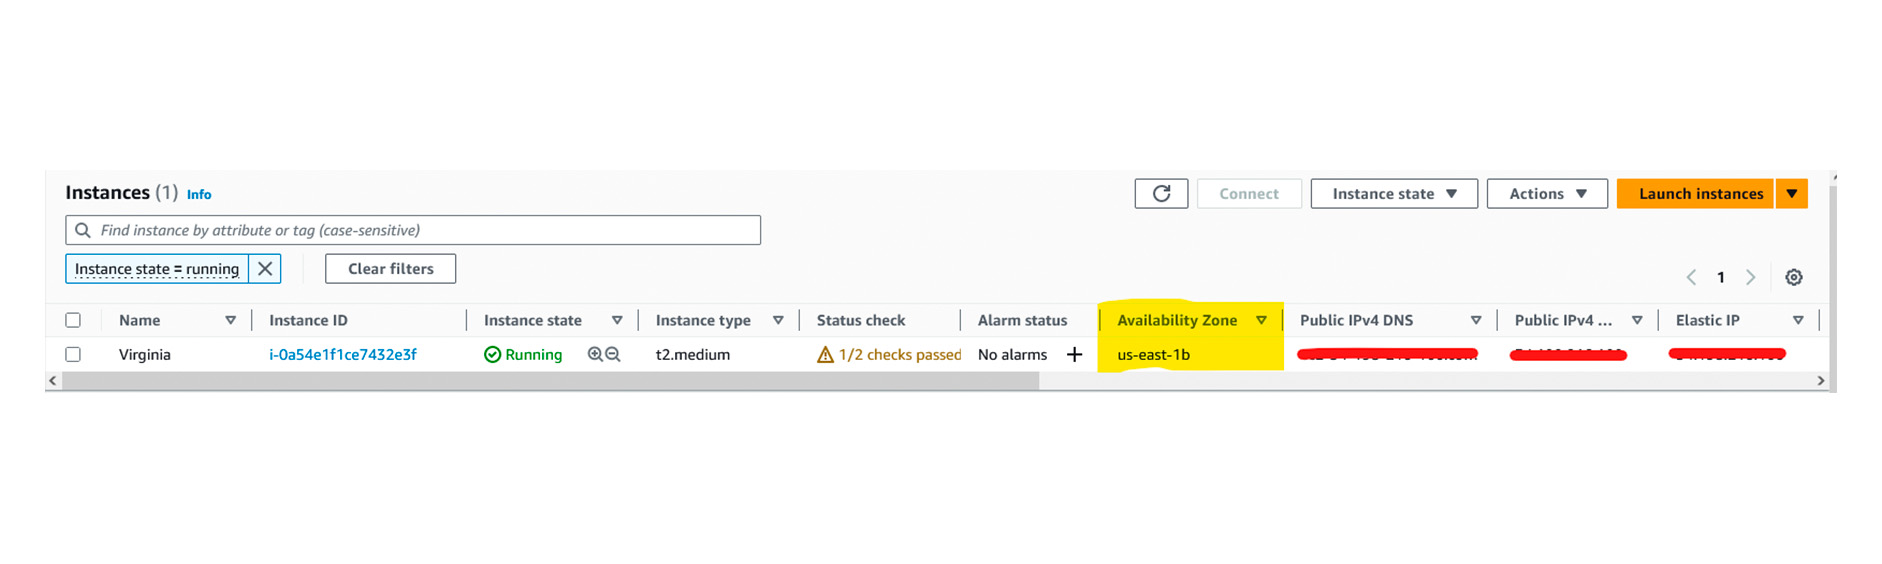 Enable Traffic in Amazon Web Services (AWS)
If you are using cloud-based machines, such as AWS, you will need to create inbound rules for both the Master node and the Slave nodes.
The following screenshots illustrate how to do this:
Master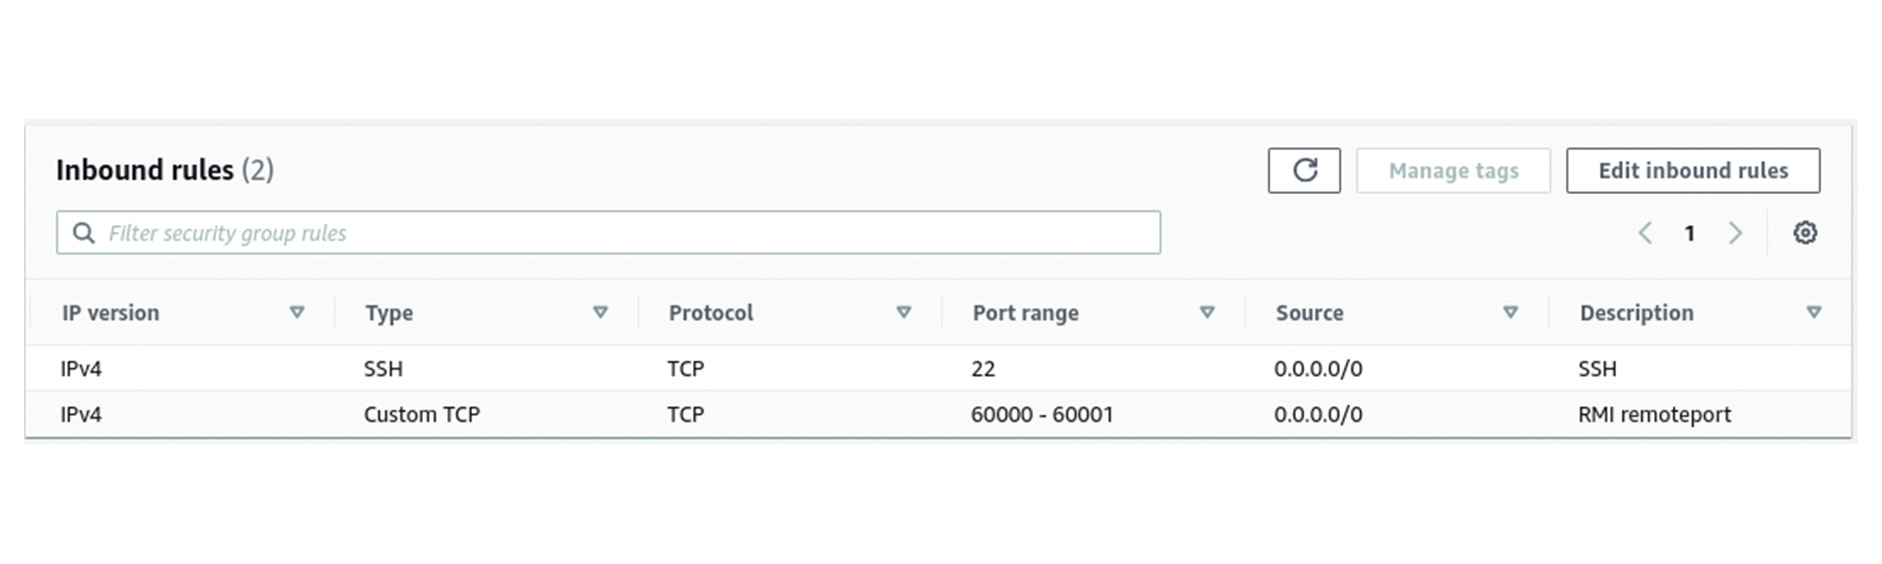 Slaves
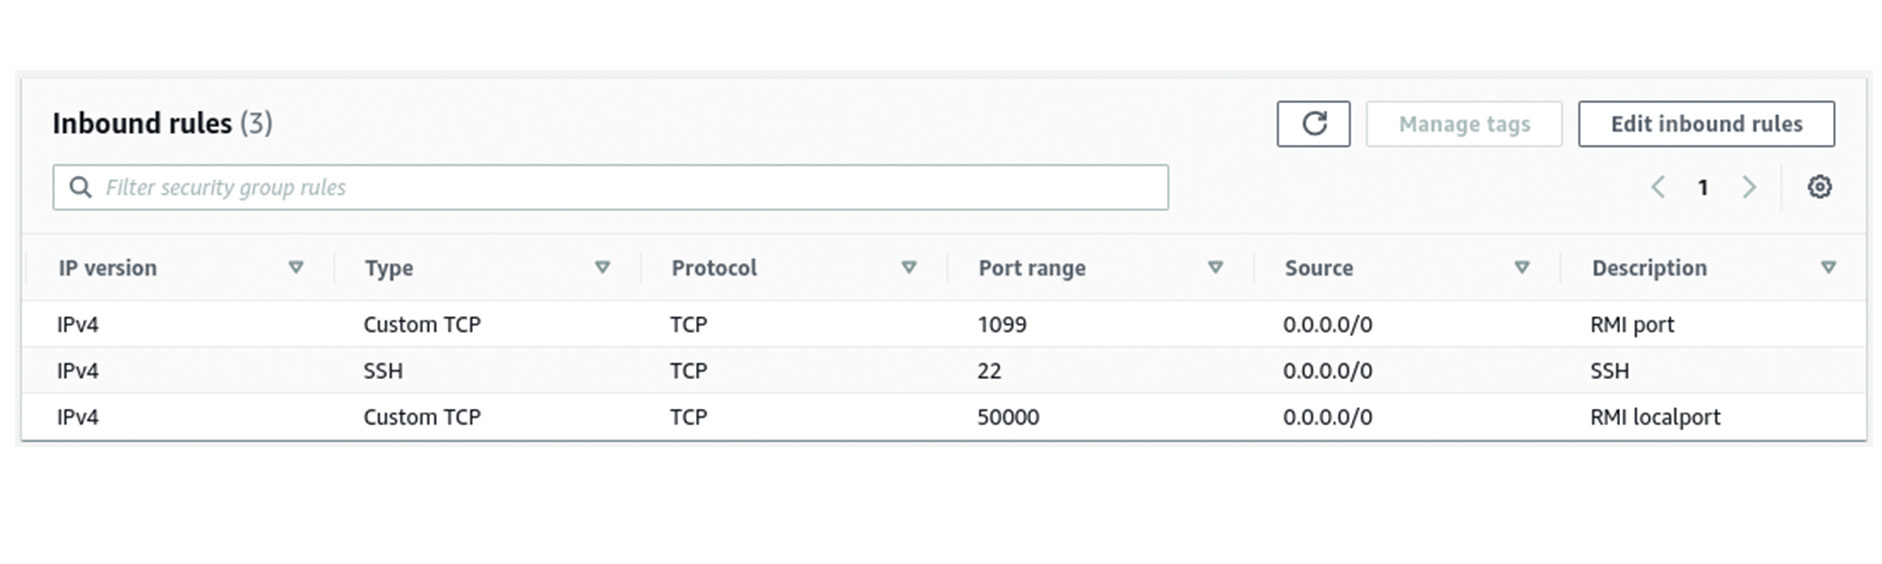
When you reach the limit, various Java, JMeter, or operating system errors or exceptions can occur. In these cases, it’s important to apply the following configurations:
Operating System Parameters (Linux)
First, you should configure kernel execution parameters. To do this, modify the file /etc/sysctl.d/99-sysctl.conf (a text file that can be edited using tools like nano or vi) and include the following parameters:
kernel.shmall = 4294967296
fs.file-max = 250000
net.ipv4.ip_local_port_range = 1024 65535
kernel.pid_max = 4194303
net.ipv4.tcp_tw_reuse = 1
Actualizar los parámetros de las nuevas configuraciones con el siguiente comando:
sysctl -p
JMeter Preparation
Add setenv.sh to the /bin directory of JMeter and define JVM parameters as follows:
export HEAP=”-Xms32G -Xmx32G -XX:MetaspaceSize=1G -XX:MaxMetaspaceSize=1G”
Multiple JMeter Instances Configuration
Copy the JMeter installation folder and append -1 and -2 to the end, for example: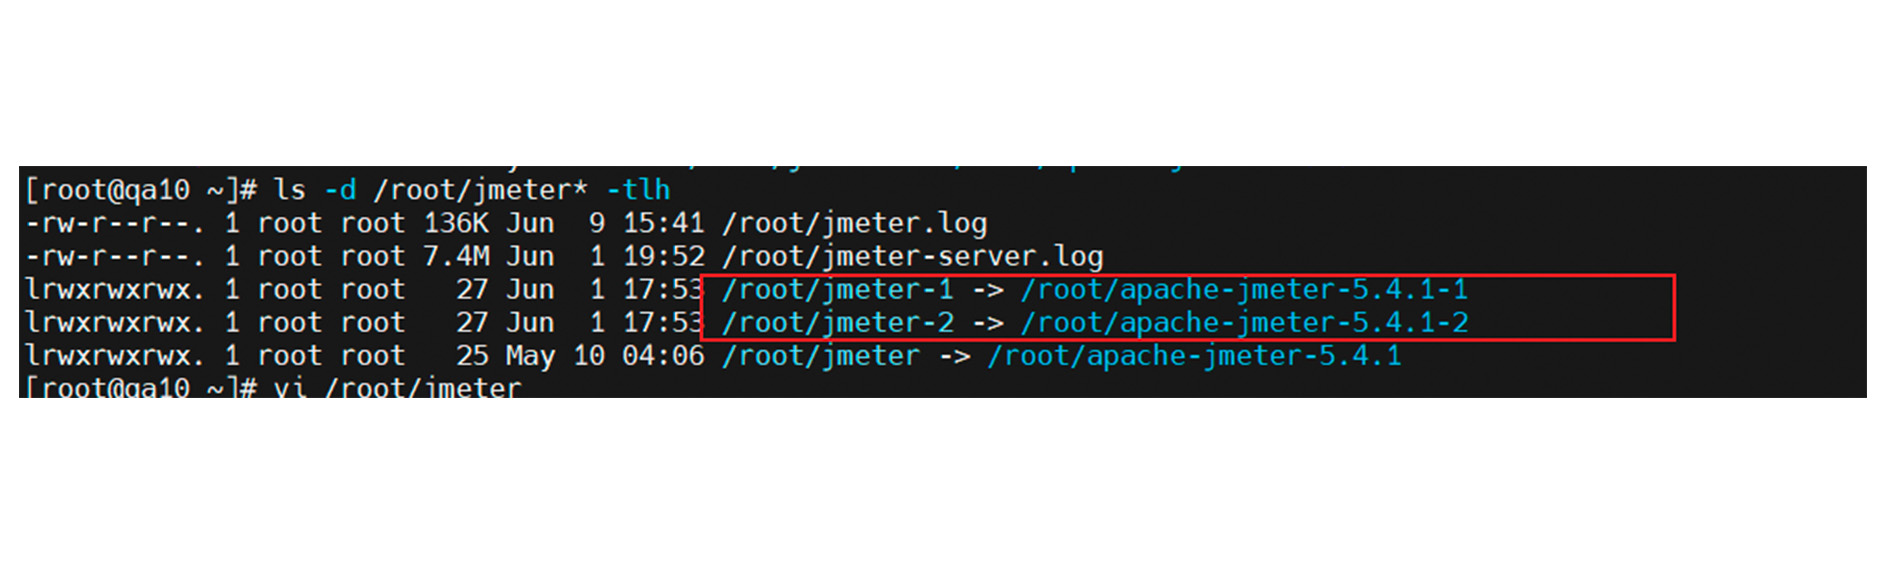 Each of the corresponding jmeter-server instances must be started for each JMeter instance on the machine, taking into account the necessary port configurations.
Verification
To check if your system configuration can support 50,000 users, you can use a test script and run it as shown below:

You can check the number of threads during execution with the following command:
ps -eLf | grep java | wc -l
Conclusions
This guide presented the steps for conducting a distributed load test using the JMeter tool on Windows and Linux operating systems.
A specific configuration for high concurrency was outlined, tested with AWS cloud-based machines, generating up to 1 million concurrent users using up to 20 Slave nodes.
Using AWS instances for load test execution provides the scalability needed to simulate different scenarios.
SHARE:

